73D41416194E8A7C390936971FB2B74B Chira Sathi: tips and tricks
Showing posts with label tips and tricks. Show all posts

Friday, September 30, 2011

Related Posts Widget For Blogger - Optimized Version

related posts widgetDisplay thumbnails of posts having same labels or categories at the bottom of each blog page engages the reader more and increases the pageviews. By far we have two best related posts gadgets created so far one is by linkwithin which I am sharing in this tut and another one displays just links and I will share it in my next post. This widget Loads fast and you don't need to install any scripts for this as the widget codes are stored on linkwithin servers. This tutorial is the most detailed one ever written on linkwithin so kindly follow the steps carefully. Please see a demo first,
Live Demo

Add Linkwithin to Blogger

The steps are very simple:
  1. Go To Linkwithin
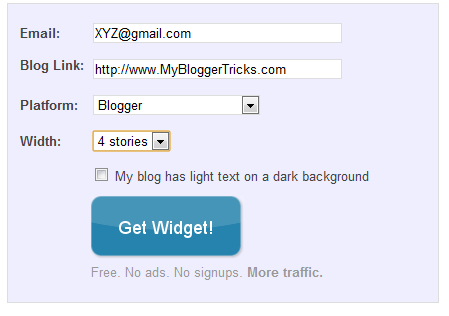
  2. Fill up the easy blanks and do as they say. The screenshot below will help,
related posts
  3.   Keep the width to three stories i.e three thumbnails if your post width is less than 500px
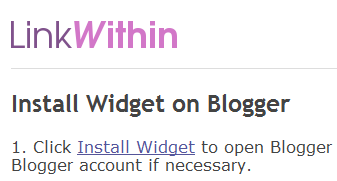
  4.   Hit the Get Widget button and then click the Install Widget link on the next page as shown below,
related posts linkwithin
  5.   Change the Title to Related Posts: or anything you may like as shown below,
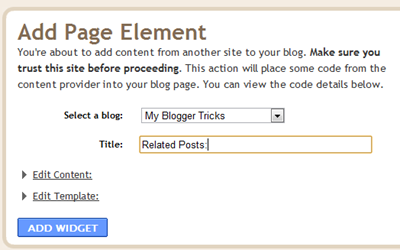
related posts widget
  6.  Now Click the Edit Template Link
related posts widget
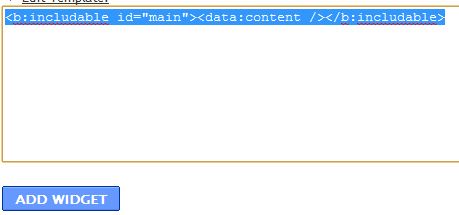
  7.   Replace the code that you see with this one:
<b:includable id='main'><b:if cond='data:blog.pageType == &quot;item&quot;'><data:content/></b:if></b:includable>
The above code will hide the thumbnails from appearing on homepage.
  8.   Next click the Edit Content Link and add the following additional code just above the code inside the widget,
<script>linkwithin_text='Related Posts:'</script>
Replace Related Posts:  with any text you want.
   9.  Finally hit the ADD WIDGET button.
  9.  Once you are taken to the Page Elements page of your blogger account, simply drag the widget to the bottom of your post body as shown below,
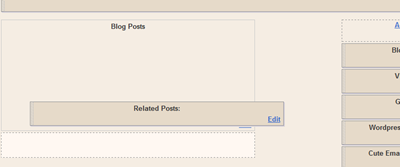
related posts
   10.  Click the "Save" orange button at the top-right corner and you are done!
Let me know if you needed any further help on this. I hope the slight customization may prove helpful to you. Peace.


Feedburner Recent Posts Widget For Blogger

Feedburner Recent Post Widget You might have seen recent post widget hanging on the sidebar of several blogs but most often this widgets have a JavaScript Code in it that badly increases the load time of your page. Today we will learn how to add a Recent posts widget offered by  Feedburner to your blogs which is tidy, attractive, unique and most importantly fast loading.
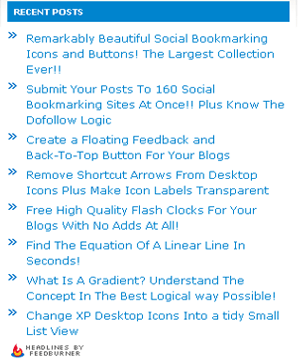
Let me tell you that Feedburner also uses JavaScript but it’s really smart when it comes to page Load time, because the JavaScript is not directly linked to your blog, 50% of the load time is shared by FeedBurner.
Feedburner Recent Posts Widget

Feedburner as you all know is the best web service for submitting your blog feed. Once you sign up with them they will provide you with several widgets like a Rotating Headlines Banner, Subscription Email form as you can see on my sidebar, a feed counter and most importantly a Recent Post widget like the one on my sidebar,
feedburner-recent-post-widg
These are steps you may follow,
1. Sign up for a Feedburner Account , which I hope you already have.
2. Log in your account and click on the Publicize button as shown below,
publicize
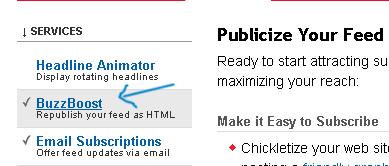
3. Then Click on BuzzBoost on the sidebar at your left.
buzzboost
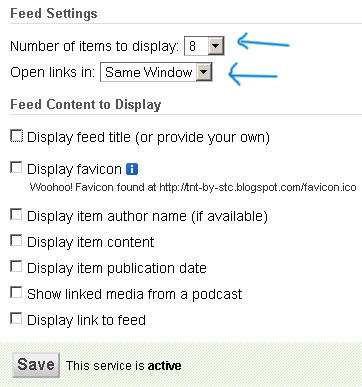
4. On the page that opens , you will see a small form,
feed-form
Fill the form with relevant information. Leave all Boxes unchecked. Keep the number of items (Links) as low as possible. You can choose 8 links to be displayed but 6 would be better. Choose Links to be opened in Same Window
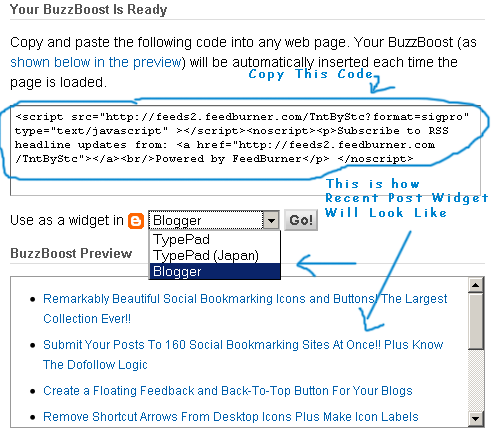
5. Now copy the code they provide you as shown below,
Copy-this-Code
6. Log in your blogger Account and then go to Layout > Page Elements
Layout
7. Select add a gadget and the choose HTML/JavaScript
add-a-gadget
html-javascript
8. Now Paste the code into the widget and give it a title “ Recent Posts”
9. Done!

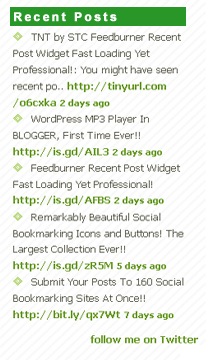
To add a Twitter Recent Posts Widget to your blogs Click this -> Twitter Recent Post Widget
DO let me know whether you liked the Feedburner Widget or not?

Advanced Multi Tabbed Widget For Blogger – Fully Widgetized!

Step#6 has been updated. Repeat that step to get it working just perfect.
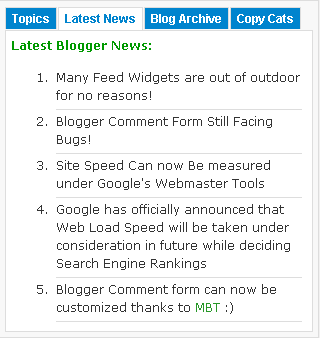
multi-tabbed-widget I had published a post on how to add a multi tab widget to your blogger blogs and how to customize it to suit your blog layout some months ago. The only problem with that widget is that it is not fully widgetized i.e you can not add archives, labels, author profile or other blogger official widgets to it unless you have their separate code with you. I just came across a beautiful and a more flexible and advanced tabber widget stylized by Lawny Designs and scripted by Barelyfitz. I have modified lawny’s tutorial and have made some changes to the code so to make it even more simpler to newbie bloggers. You can view this widget hanging on my sidebar.

To add this cute multi tab widget to your BlogSpot blogs follow these steps.
  1. Go to Blogger > Layout > Edit HTML
  2. Search For </head>
  3. And paste the code below just above it,
<script type='text/javascript'>
//<![CDATA[
document.write('<style type="text/css">.tabber{display:none;}<\/style>');
function tabberObj(argsObj)
{
  var arg;
  this.div = null;
  this.classMain = "tabber";
  this.classMainLive = "tabberlive";
  this.classTab = "tabbertab";
  this.classTabDefault = "tabbertabdefault";
  this.classNav = "tabbernav";
  this.classTabHide = "tabbertabhide";
  this.classNavActive = "tabberactive";
  this.titleElements = ['h2','h3','h4','h5','h6'];
  this.titleElementsStripHTML = true;
  this.removeTitle = true;
  this.addLinkId = false;
  this.linkIdFormat = '<tabberid>nav<tabnumberone>';
  for (arg in argsObj) { this[arg] = argsObj[arg]; }
  this.REclassMain = new RegExp('\\b' + this.classMain + '\\b', 'gi');
  this.REclassMainLive = new RegExp('\\b' + this.classMainLive + '\\b', 'gi');
  this.REclassTab = new RegExp('\\b' + this.classTab + '\\b', 'gi');
  this.REclassTabDefault = new RegExp('\\b' + this.classTabDefault + '\\b', 'gi');
  this.REclassTabHide = new RegExp('\\b' + this.classTabHide + '\\b', 'gi');
  this.tabs = new Array();
  if (this.div) {
    this.init(this.div);
    this.div = null;
  }
}
tabberObj.prototype.init = function(e)
{
  var
  childNodes,
  i, i2,
  t,
  defaultTab=0,
  DOM_ul,
  DOM_li,
  DOM_a,
  aId,
  headingElement;
  if (!document.getElementsByTagName) { return false; }
  if (e.id) {
    this.id = e.id;
  }
  this.tabs.length = 0;
  childNodes = e.childNodes;
  for(i=0; i < childNodes.length; i++) {
    if(childNodes[i].className &&
       childNodes[i].className.match(this.REclassTab)) {
      t = new Object();
      t.div = childNodes[i];
      this.tabs[this.tabs.length] = t;
      if (childNodes[i].className.match(this.REclassTabDefault)) {
    defaultTab = this.tabs.length-1;
      }
    }
  }
  DOM_ul = document.createElement("ul");
  DOM_ul.className = this.classNav;
  for (i=0; i < this.tabs.length; i++) {
    t = this.tabs[i];
    t.headingText = t.div.title;
    if (this.removeTitle) { t.div.title = ''; }
    if (!t.headingText) {
      for (i2=0; i2<this.titleElements.length; i2++) {
    headingElement = t.div.getElementsByTagName(this.titleElements[i2])[0];
    if (headingElement) {
      t.headingText = headingElement.innerHTML;
      if (this.titleElementsStripHTML) {
        t.headingText.replace(/<br>/gi," ");
        t.headingText = t.headingText.replace(/<[^>]+>/g,"");
      }
      break;
    }
      }
    }
    if (!t.headingText) {
      t.headingText = i + 1;
    }
    DOM_li = document.createElement("li");
    t.li = DOM_li;
    DOM_a = document.createElement("a");
    DOM_a.appendChild(document.createTextNode(t.headingText));
    DOM_a.href = "javascript:void(null);";
    DOM_a.title = t.headingText;
    DOM_a.onclick = this.navClick;
    DOM_a.tabber = this;
    DOM_a.tabberIndex = i;
    if (this.addLinkId && this.linkIdFormat) {
      aId = this.linkIdFormat;
      aId = aId.replace(/<tabberid>/gi, this.id);
      aId = aId.replace(/<tabnumberzero>/gi, i);
      aId = aId.replace(/<tabnumberone>/gi, i+1);
      aId = aId.replace(/<tabtitle>/gi, t.headingText.replace(/[^a-zA-Z0-9\-]/gi, ''));
      DOM_a.id = aId;
    }
    DOM_li.appendChild(DOM_a);
    DOM_ul.appendChild(DOM_li);
  }
  e.insertBefore(DOM_ul, e.firstChild);
  e.className = e.className.replace(this.REclassMain, this.classMainLive);
  this.tabShow(defaultTab);
  if (typeof this.onLoad == 'function') {
    this.onLoad({tabber:this});
  }
  return this;
};
tabberObj.prototype.navClick = function(event)
{
  var
  rVal,
  a,
  self,
  tabberIndex,
  onClickArgs;
  a = this;
  if (!a.tabber) { return false; }
  self = a.tabber;
  tabberIndex = a.tabberIndex;
  a.blur();
  if (typeof self.onClick == 'function') {
    onClickArgs = {'tabber':self, 'index':tabberIndex, 'event':event};
    /* IE uses a different way to access the event object */
    if (!event) { onClickArgs.event = window.event; }
    rVal = self.onClick(onClickArgs);
    if (rVal === false) { return false; }
  }
  self.tabShow(tabberIndex);
  return false;
};
tabberObj.prototype.tabHideAll = function()
{
  var i;
  for (i = 0; i < this.tabs.length; i++) {
    this.tabHide(i);
  }
};
tabberObj.prototype.tabHide = function(tabberIndex)
{
  var div;
  if (!this.tabs[tabberIndex]) { return false; }
  div = this.tabs[tabberIndex].div;
  if (!div.className.match(this.REclassTabHide)) {
    div.className += ' ' + this.classTabHide;
  }
  this.navClearActive(tabberIndex);
  return this;
};
tabberObj.prototype.tabShow = function(tabberIndex)
{
  var div;
  if (!this.tabs[tabberIndex]) { return false; }
  this.tabHideAll();
  div = this.tabs[tabberIndex].div;
  div.className = div.className.replace(this.REclassTabHide, '');
  this.navSetActive(tabberIndex);
  if (typeof this.onTabDisplay == 'function') {
    this.onTabDisplay({'tabber':this, 'index':tabberIndex});
  }
  return this;
};
tabberObj.prototype.navSetActive = function(tabberIndex)
{
  this.tabs[tabberIndex].li.className = this.classNavActive;
  return this;
};
tabberObj.prototype.navClearActive = function(tabberIndex)
{
  this.tabs[tabberIndex].li.className = '';
  return this;
};
function tabberAutomatic(tabberArgs)
{
  var
    tempObj,
    divs,
    i;
  if (!tabberArgs) { tabberArgs = {}; }
  tempObj = new tabberObj(tabberArgs);
  divs = document.getElementsByTagName("div");
  for (i=0; i < divs.length; i++) {
    if (divs[i].className &&
    divs[i].className.match(tempObj.REclassMain)) {
      tabberArgs.div = divs[i];
      divs[i].tabber = new tabberObj(tabberArgs);
    }
  }
  return this;
}
function tabberAutomaticOnLoad(tabberArgs)
{
  var oldOnLoad;
  if (!tabberArgs) { tabberArgs = {}; }
  oldOnLoad = window.onload;
  if (typeof window.onload != 'function') {
    window.onload = function() {
      tabberAutomatic(tabberArgs);
    };
  } else {
    window.onload = function() {
      oldOnLoad();
      tabberAutomatic(tabberArgs);
    };
  }
}
/* Run tabberAutomaticOnload() unless the "manualStartup" option was specified */
if (typeof tabberOptions == 'undefined') {
    tabberAutomaticOnLoad();
} else {
  if (!tabberOptions['manualStartup']) {
    tabberAutomaticOnLoad(tabberOptions);
  }
}
//]]>
</script>


4.  Now search for ]]></b:skin>  and just above it paste this code,
/*---------- Tabber Start-------- */

.tabberlive{
margin:0;
padding:5px;
clear:both;
background:$tbbxbgcolor;
border:1px solid $tbbxbrcolor;
}
.tabbernav {
margin:0;
padding: 3px 0;
border-bottom: 1px solid $tbbxbrcolor;
font-family:Arial,Helvetica,sans-serif;
font-size:12px;
font-weight:bold;
}
.tabbernav li {
list-style:none;
margin:0;
display:inline;
}
.tabbernav li a {
padding:3px 0.5em;
margin-right:1px;
border:1px solid $tbbxbrcolor;
border-bottom:none;
background:$tbbxcolor2;
text-decoration:none;
color:$tbbxcolor1;
}
.tabbernav li a:hover {
color:$tbbxcolor2;
background:$tbbxcolor1;
border-color:$tbbxbrcolor;
text-decoration:none;
}
.tabbernav li.tabberactive a,
.tabbernav li.tabberactive a:hover {
background:$tbbxcolor1;
color:$tbbxcolor2;
border-bottom: 1px solid $tbbxcolor1;
}
.tabberlive .tabbertab {
padding:5px;
border:1px solid $tbbxbrcolor;
border-top:0;
background:$tbbxcolor1;
}
.tabberlive .tabbertab h2,
.tabberlive .tabbertabhide {
display:none;
}
.tabbertab .widget-content ul{
list-style:none;
margin:0 0 10px 0;
padding:0;
}
.tabbertab .widget-content li {
border-bottom:1px solid $tbbxbrcolor;
margin:0 5px;
padding:2px 0 5px 0;
}

/*------- Tabber End--------*/

5.  Don’t save your template. Now search for Variable definitions and paste this code with other variable definitions,
<Variable name="tbbxbgcolor" description="Tab box Background Color" type="color" default="#f8f8f8" value="#f8f8f8">
<Variable name="tbbxbrcolor" description="Tab box Border Color" type="color" default="#dcdcdc" value="#dcdcdc">
<Variable name="tbbxcolor1" description="Tab box Color 1" type="color" default="#ffffff" value="#ffffff">
<Variable name="tbbxcolor2" description="Tab box Color 2" type="color" default="#5588aa" value="#5588aa">


If you can’t find Variable definitions  then search for #navbar-iframe and paste this code below #navbar-iframe { Some text here }
/* Variable definitions
   ====================
<Variable name="tbbxbgcolor" description="Tab box Background Color" type="color" default="#f8f8f8" value="#f8f8f8">
<Variable name="tbbxbrcolor" description="Tab box Border Color" type="color" default="#dcdcdc" value="#dcdcdc">
<Variable name="tbbxcolor1" description="Tab box Color 1" type="color" default="#ffffff" value="#ffffff">
<Variable name="tbbxcolor2" description="Tab box Color 2" type="color" default="#5588aa" value="#5588aa">

*/

UPDATED PART:
6.   Now the final part. Search for <div id='sidebar-wrapper'> and paste this code just below it,
<div style='clear:both;'/>
<div class='tabber'>
<b:section class='tabbertab' id='tab1' maxwidgets='1'/>
<b:section class='tabbertab' id='tab2' maxwidgets='1'/>
<b:section class='tabbertab' id='tab3' maxwidgets='1'/>
<b:section class='tabbertab' id='tab4' maxwidgets='1'/>

</div>


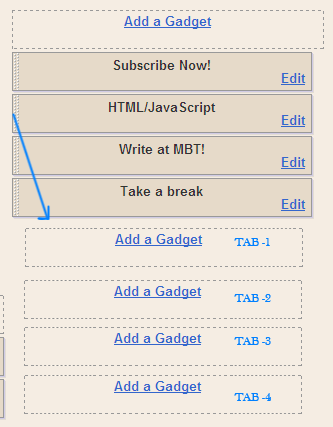
7. Finally save your template and visit Layout > Page Elements to start adding widgets to the tabs! It will look something like this,
MULTI-TABBED-WIDGET
The widgets are arranged number wise. Starting from Tab-1 and ending at Tab-4. To add a gadget/widget to any tab simply click the link Add a Gadget and start adding whatever you want.
8. Finally view your template to see it hanging!:)

Customization Guide To Multi Tab Widget

Here we will discuss how to change the Look and position of this multi tabbed widget.
Changing Position:
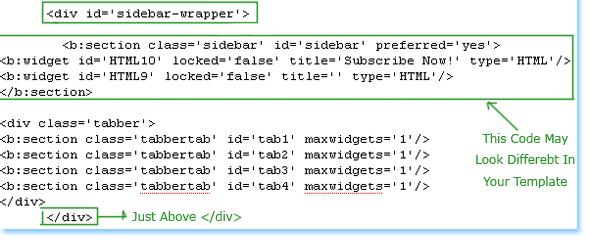
To shift this tabber widget to the bottom section of your sidebar rather at the extreme top, do this,
  • Paste the code in Step#6 just above </div> and not just below <div id='sidebar-wrapper'> As shown in the image below,
Shift-position-of-tabber
  • Save your template and go to Layout > Page Elements  to see if it has shifted to the bottom.
Changing Look and Feel:
  • The background colours of the widget can be changed by editing the code in step#5. I am rewriting the code here with some description.
<Variable name="tbbxbgcolor" description="Tab box Background Color" type="color" default="#f8f8f8" value="#f8f8f8">

<Variable name="tbbxbrcolor" description="Tab box Border Color" type="color" default="#dcdcdc" value="#dcdcdc">

<Variable name="tbbxcolor1" description="Tab box Color 1" type="color" default="#ffffff" value="#ffffff">

<Variable name="tbbxcolor2" description="Tab box Color 2" type="color" default="#289728" value="#289728">

This code has four main sections amongst which the sections tbbxcolor1: and  tbbxcolor2: are the most important. I will describe each one in detail.
Important Sections:
tbbxcolor1: This is an important section. It defines the background colour of this multi tab widget and also the colour on mouse hover. The default colour is white i.e #ffffff
tbbxcolor2: This refers to the background colour of the tabs and the text inside the tabs. the default colour is green. You can change the value #289728 to a different colour value using our color chart
Change these only if you wish:
tbbxbgcolor: This section refers to the background colour of the tab box. By default the colour is grey. If you wish to change it to a different colour simply change the hexadecimal colour value #f8f8f8 to something different using our Color Chart
tbbxbrcolor: This refers to the border line color across the tabs and the box.
That’s All!
I hope this widget will help a lot in giving a clean and neat touch to your blogs. Any question is welcomed :>

Add WordPress Style Menu Tabs Widget To Blogger!

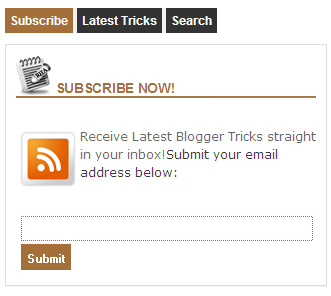
Menu-Tabs-Widget The widgets on a Wordpress Blogs surely are well designed and coded but they look even better when they are bloggerized and made compatible to work in Blogger.  Last year we created Advanced Multi Tabbed Widget that was well appreciated by everyone and today we have yet another but far improved multi tabbed widget. The best thing about this widget is that you can add as many widgets as you want inside a single Tab which you could not do previously. Beautiful CSS and Jquery effects are added this time to the tab views and I have tried again to make its installation as easy as possible. So do not delay any further and learn how to add a professional looking tabber widget to your free Blogger blogs.
Live Demo

How To Add this Multi Tabbed Widget To Blogger?

I have divided the tutorial in three parts which are,
  1. Adding the JQuery and JavaScript to your Blogger templates
  2. Adding the CSS
  3. Adding the HTML
1- Adding the JQuery and JavaScript to your Blogger templates
  1. Go To Blogger > Design > Edit HTML
  2. Backup your template
  3. Search for ]]></b:skin>
  4. Just below it paste the following code –> MBT Menu Tabs JavaScript
  5. Save your template
  6. Done!
2- Adding the CSS
  1. Inside your template search for ]]></b:skin> again
  2. Just above it paste the code below,
/*---- Wordpress Style MBT Menu Tabs----*/
.MBT-tabs{list-style:none;list-style-type:none;margin:0 0 10px 0;padding:0;height:26px}
.MBT-tabs li{list-style:none;list-style-type:none;margin:0 0 0 4px;padding:0;float:left}
.MBT-tabs li:first-child{margin:0}
.MBT-tabs li a{color:#fff;background:#333333;padding:5px 5px;display:block;text-decoration:none;font:bold 12px Arial,Helvetica,Sans-serif;}
.MBT-tabs li a:hover,.MBT-tabs li a.MBT-tabs-current{background:#A46F38;color:#fff;text-decoration:none}
.MBT-tabs-content{background:#212121}
.MBT-tabviewsection{margin-top:10px;margin-bottom:10px;}
Simply replace #A46F38 with the HexaDecimal Colour code of your template so that the tabs may blend perfectly into your template.
3- Adding the HTML
  1. Now Search for <div id='sidebar-wrapper'>
  2. Make sure the widgets box is unchecked.
  3. Just below <div id='sidebar-wrapper'> paste the code below,
<div class='MBT-tabviewsection'>
<script type='text/javascript'>
            jQuery(document).ready(function($){
                $(&quot;.MBT-tabs-content-widget-MBT-id&quot;).hide();
                $(&quot;ul.MBT-tabs-widget-MBT-id li:first a&quot;).addClass(&quot;MBT-tabs-current&quot;).show();
                $(&quot;.MBT-tabs-content-widget-MBT-id:first&quot;).show();
                $(&quot;ul.MBT-tabs-widget-MBT-id li a&quot;).click(function() {
                    $(&quot;ul.MBT-tabs-widget-MBT-id li a&quot;).removeClass(&quot;MBT-tabs-current a&quot;);
                    $(this).addClass(&quot;MBT-tabs-current&quot;);
                    $(&quot;.MBT-tabs-content-widget-MBT-id&quot;).hide();
                    var activeTab = $(this).attr(&quot;href&quot;);
                    $(activeTab).fadeIn();
                    return false;
                });
            });
        </script>
<ul class='MBT-tabs MBT-tabs-widget-MBT-id'>
<li><a href='#widget-MBT-id1'>Subscribe</a></li>
<li><a href='#widget-MBT-id2'>Latest Tricks</a></li>
<li><a href='#widget-MBT-id3'>Search</a></li>
</ul>
<div class='MBT-tabs-content MBT-tabs-content-widget-MBT-id' id='widget-MBT-id1'>
<b:section class='sidebar' id='sidebartab1' preferred='yes'>
</b:section>                                      
</div>   
<div style='clear:both;'/>                       
<div class='MBT-tabs-content MBT-tabs-content-widget-MBT-id' id='widget-MBT-id2'>
<b:section class='sidebar' id='sidebartab2' preferred='yes'>
</b:section>                                        
</div>   
                       
<div style='clear:both;'/>
<div class='MBT-tabs-content MBT-tabs-content-widget-MBT-id' id='widget-MBT-id3'>
<b:section class='sidebar' id='sidebartab3' preferred='yes'>
</b:section>                                       
</div>
</div>
<div style='clear:both;'/>

Please Replace Subscribe, Latest Tricks and Search with your Widget Titles that you will be adding.
   4.  Now Go To Page Elements. You will see something like this,
Blogger-Page-Elements Menu tabsStart adding your widgets and after you have added all your widgets then simply view your blog to see it in action. Done! :-)
Note:- Most of you will ask me several questions here as usual =d Because every template is coded differently. People who are not very familiar with HTML often find it difficult to understand this part but no worries anymore if you are not able to pass this step then kindly email me your template at mustafa.stc @ G Mail and I will tell you where should you paste the code. Plus I will also help you on how to add an extra Tab to your widget to make a total of four tabs. This help is for MBT subscribers only if you haven’t availed the opportunity of becoming a MBT reader then kindly subscribe here to avail unlimited resources.

Let me know how you find it?

I just hope this little contribution from our side will be of value to all of you. I would love to know about your precious views. Peace and blessings.

Twitter Recent Posts Widget, The Rare Widget Ever!

twitter-recent-post-widget- As I promised in my post on Feedburner Recent Posts Widget I am here to share the trick of adding a Twitter Recent Posts Widget. This widget will undoubtly add a pro touch to your blog, see it in action by Clicking Here! Many Newbie bloggers use a JavaScript Recent post widget to there blogs but to keep your blog distinct you must either choose Feedburner or Twitter. Twitter is a nice place to attract a huge traffic if used intelligently. Adding the twitter recent post widget will surely increase the number of your followers and indirectly the traffic to your blog. So now before wasting any more time, lets get to work!
This widget requires two things
  1. Sign up for twitter Feed 
  2. A twitter account ( Which is Obvious :D )


1.  Sign up for twitter Feed

For your latest posts to be shown in twitter widget you must submit your RSS feeds to a free web service called twitterfeed  They will post your latest blog posts along with the title and description in your twitter account for free! You just sit back and relax.
This is what you need to do,
1. Visit twitterfeed 
twitterfeed
2. Create an OPen ID to sign up for a twitterfeed account
OpenId is an Id just like your blogger Id that lets you log into thousand’s of web services without the need of signing up for an account. In short its a free ticket that lets you take a complete ride of thousands of remarkable websites that accept OpenId and luckily blogger and twitterfeed  is one of them.
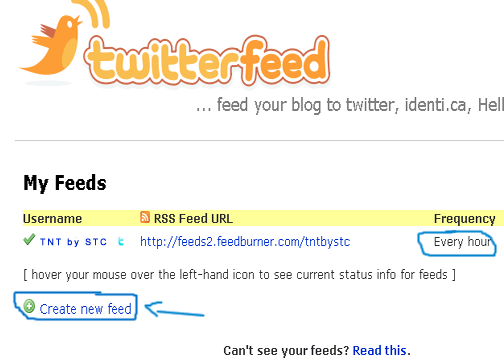
3. Once you have created your OpenId, log into twitterfeed Then click on the button that says Create new Feed
twitterfeed1
A form is what you will see next,
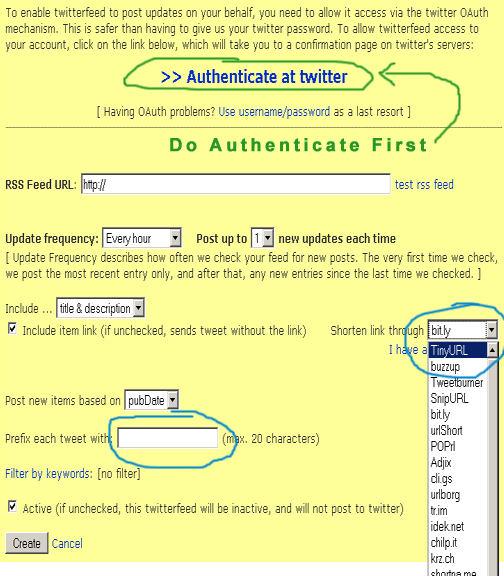
twitter-feed-form
First and foremost click at the link saying Authenticate At Twitter This will tell twitter.com whether twitterfeed  is allowed to access your twitter account or not. After authenticating, fill up the form by following the steps below,
  • In RSS Feed URL type this,
http://tnt-by-stc.blogspot.com/feeds/posts/default
Remember to replace the URL in red with your blog URL
You can also add your Feedburner Feed URL , which will look like this,
http://feeds2.feedburner.com/tntbystc
Again make sure to replace the text in red with your feed title
  • Set the Update Frequency to Every hour and Post up to to 1
  • Write your Blog title in the box next to Prefix each tweet with and check the box just below it
  • For Shorten Link through choose TinyURL
  • Finally check the box at bottom to activate your tweets
  • Hit Create and you are Done!
After your tweet feeds are activated you will see a page as shown below,
twitterfeed1
It will take 30 minutes or less for your feed status to be activated. During this time read further on how to get a Twitter widget for displaying your latest posts in it.
2. Visit twitter.com/widgets
twitter-for-blogger
You will have four options where you can add your twitter widget but since I share blogger Tips and tricks (TNT) I will go for blogger :)
Click Continue to set your twitter widget. You will come across a configuration page as shown below,select-settings-and-copy-tw
You have the choice of showing up to 20 posts on your widget but I would suggest just 5 for better page load time. I would also suggest not to give a title to this widget, we will give it a title later on.
You have two choices to add your cool looking twitter widget to your blog either by clicking the Add to blogger button or grab the code link. I love to add codes to my template myself so I will go for grab the code
Copy the code they provide you,
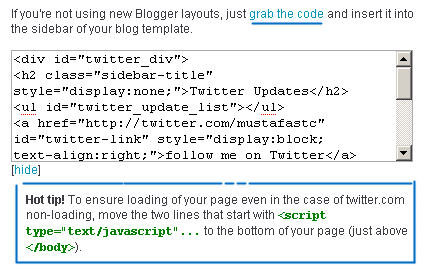
copy-the-code  Note:- Don’t worry about that Hot tip! I am here to take all that headache  :D
Log into your blogger account and go to Layout > Page Elements
Layout
Click on Add a gadget,
add-a-gadget
Choose HTML/JavaScript
html-javascript

Paste the code in this widget and give it a title like “Recent Posts” or “Latest Stories
And your are Done! with a beautiful and unique Recent posts widget like the one at this blog
Feel free to ask tough questions

Social Bookmarking Widget For Blogger – Bookmark and Share homepages!

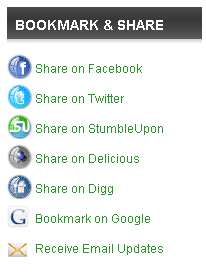
Bookmarking-Widget For Blogger With the release of Cute Box blogger Template I also released some useful blogger widgets which includes a Bookmarking Widget For your blog’s homepage. This widget helps readers to bookmark your blog’s homepage on their favourite bookmarking services like Google bookmark, Stumbleupon, Delicious, Digg etc. It contains icons from  our Circular Style Social Media Icon Set. This is how this widget looks like,
Bookmarking Widget
To add this widget to your blogs, follow these steps,

  1. Go To Blogger > Layout
  2. Click Add a Gadget or Add a Page element
  3. Choose HTML/JavaScript
  4. Inside HTML/JavaScript paste the code below,
<center><tr>
<td valign="top" width="50%">
<table border="0" cellpadding="0" cellspacing="0" width="222">
<tbody>
<tr>
<td width="28" height="30"><img border="0" width="25" src="https://blogger.googleusercontent.com/img/b/R29vZ2xl/AVvXsEg8TnPN1eGNOjrtOK7rTfaKKX0I4TD3VUFvQ4F-18BReEnZMEUSd9_zqnBgc7BpcoCMR9HKlwNCfaQHg9FdYscfnA9EcLlSkprOHY50PW7hlh6tRQRb3Bo2zK96TiEeb3QEOEY_7ESCCyA/s400/FACEBOOK.png" height="25"/></td>
<td height="30"><a href="http://www.facebook.com/sharer.php?u=http://YOUR-BLOG-NAME.blogspot.com" target="_blank" rel="nofollow">Share on Facebook</a></td>
</tr>
<tr>
<td height="30"><img border="0" width="25" src="https://blogger.googleusercontent.com/img/b/R29vZ2xl/AVvXsEhqwqMscsW8GPR-ZwtEEX7heWt9mxK30byD0OB82qCgwvYS0qkRIoe8o-gjjxq29MCridmwbl4f9XzLQoMFpnfP2CjeCAWxGzbt7eBF1jwi_wMLyGhL5AYBCBurguEOapwG9eqReSbuGmw/s400/TWITTER.png" height="25"/></td>
<td height="24">
<a href="http://twitthis.com/twit?url=http://YOUR-BLOG-NAME.blogspot.com">Share on Twitter</a></td>
</tr>
<tr>
<td height="30"><img border="0" width="25" src="https://blogger.googleusercontent.com/img/b/R29vZ2xl/AVvXsEjbxjPYELpkLY7kSDUMuO2rVDqbuGgxe9xtLqCNPPJX7Bhh2koDAvKdLV80lqsJ0BUOOcUhbrCnAiNTnV_K0hsRJmealgutt9fidf5_L6MUHFhoOCHTKahENjO5n5oqensCpN2LkSjairk/s400/STUMBLE-UPON.png" height="25"/></td>
<td height="30"><a href="http://www.stumbleupon.com/submit?url=http://YOUR-BLOG-NAME.blogspot.com" target="_blank" rel="nofollow">Share on StumbleUpon</a></td>
</tr>
<tr>
<td height="30"><img border="0" width="25" src="https://blogger.googleusercontent.com/img/b/R29vZ2xl/AVvXsEgtV7AM5ienoGXXq8YcbvmIEuvgrZbTuHF6kd1EnQ6KCCTzJLQLM-U8ABVR2kiZRFwZTEpieIYLib39jg4zcv-c4N3ZxRwLJcZRjSkSG3ZTJTM23bWi7GmlbK2yio3XrLz8h5qnsZUpEI0/s400/DELICIOUS.png" height="25"/></td>
<td height="30"><a href="http://del.icio.us/post?url=http://YOUR-BLOG-NAME.blogspot.com" target="_blank" rel="nofollow">Share on Delicious </a></td>
</tr>
</tbody>
</table>
</td>
<td valign="top" width="50%">
<table border="0" cellpadding="0" cellspacing="0" width="222">
<tbody>
<tr>
<td width="28" height="30"><img border="0" width="25" src="https://blogger.googleusercontent.com/img/b/R29vZ2xl/AVvXsEjXNC5w5twpa3XFkaMgUaXufcNJ4G28YDgckBcoM90a9oJEoSYJ2FhAksDlOfIcx_biI5DtM-vNG02v8W9Zls8HQeX0HuXs4cHd0bVHZdrVvXr0sXwR9EuQNmShvOAHhDyaAi_betAluUY/s400/DIGG.png" height="25"/></td>
<td height="30"><a href="http://digg.com/submit?phase=2&url=http://YOUR-BLOG-NAME.blogspot.com" target="_blank" rel="nofollow">Share on Digg </a></td>
</tr>
<tr>
<td height="30"><img border="0" width="22" src="https://blogger.googleusercontent.com/img/b/R29vZ2xl/AVvXsEg_EnTCM1w7EIolAYMQsdIHu3WTSt18T_Mb5VmpQIo2l-E76iqAdLvbIvKHsyfsIRBmaTO1LmH5aAF3BEeVgVtfHIWAVRhQ0uT_K___T_NAwuWX-6hCMx48nyVNE80GjT0HtMWq7j1dK2Q/s400/Google-icon.jpg" height="22"/></td>
<td height="30"><a href="http://www.google.com/bookmarks/mark?op=edit&amp;output=popup&amp;bkmk=http://YOUR-BLOG-NAME.blogspot.com" target="_blank" rel="nofollow" title="Bookmark this blog on Google">Bookmark on Google</a></td>
</tr>
<tr>
<td height="30"><img border="0" alt="Email" width="21" src="https://blogger.googleusercontent.com/img/b/R29vZ2xl/AVvXsEjK94ive5_mGXDW_8SCB4qqThk5WWMI0E8hE0LqwpaY2xnpVVJVp5waoW_F43kds7JLof1xmmH9QAc6zAsj9_CK0DDdxjke02h73DqqZUJzC8vyzr5xnHc6NlE6BmzIMyDPh49fv5tnMPNp/s400/Email+Orange_128.png" height="22"/></td>
<td height="30"><a href="http://feedburner.google.com/fb/a/mailverifyuri=tntbystc&amp;loc=en_US" target="_blank" rel="nofollow">Receive Email Updates</a>
</td>
</tr>
</tbody>
</table></td></tr></center>
Remember to replace YOUR-BLOG-NAME  with your Blog’s good name and the Subscription Link i.e http://feedburner.google.com/fb/a/mailverifyuri=tntbystc&amp;loc=en_US with your own Feedburner subscription link. You can find your subscription link by going to the following location in your feedburner account, Publicize > Email Subscription . Just below Email Subscription page you will find a code as shown below,
subscription-link

Finally save your widget and preview your blog to see the new change!

Create Wordpress Subscription Form

image
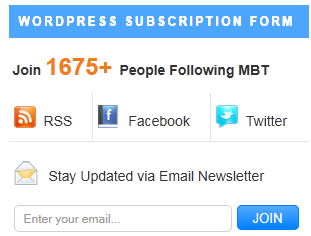
It's a long time since we last released a widget. The widget today is really a useful one. It is a smart container which displays the total number of subscribers, contains RSS link, Facebook link and Twitter link. It also contains a beautiful subscription form where visitors can submit there emails to receive free website updates. This Widget is made Compatible to work with all browsers especially with IE8.
I named it Wordpress Subscription Form because you might have seen such widgets on every Wordpress blog and Blogger lacks it.

To have a look at our previously designed Subscription Forms kindly visit these links,

Live Demo


How To Create Wordpress Subscription Form?

The steps are made really simple. Follow these,
  1. Go To Blogger > Design
  2. Select an HTML/JavaScript Widget
  3. Paste the code below into the widget
<style>
.mbtbar{width: 100%; float: left;}
.mbtbar .count{color:#333; font-size: 14px; font-weight: bold; font-family: Helvetica, Arial; background: #fff; height: 45px; line-height: 45px; vertical-align: middle; width: 100%; padding: 0 10px 0 4px;}
.mbtbar .count span.bigcount{color:#F17C18; font-size: 24px; font-family: Helvetica, Arial; line-height: 39px; vertical-align: top; padding-right:3px;}
.mbtbar .subicons{border-bottom: 1px solid #e6e6e6; margin: 0px 0 0px 0; float: left; width: 300px; font-family: Helvetica, Arial; font-size: 14px;}
.mbtbar .subicons a{text-decoration: none; color:#333333;}
.mbtbar .subicons a:hover{text-decoration: underline; color:#333333;}
.mbtbar .subicons .rssicon{border-right: 1px solid #e6e6e6; background: url(https://blogger.googleusercontent.com/img/b/R29vZ2xl/AVvXsEh3RH70_hLspUQp0pFEZl_mN64PFjIAvz7c_QI35CFkZW9N-RYPQsuRoK2A4-NlSG_FW6vNaf7fg4Ovi3iHrDp0pys0RlL5n35bQAjSUm3A4s75G3hDCnXlojNNBvH5tBkyHVQQhP4ybZc/s400/rss.png) no-repeat left center; min-width: 20px; height: 48px; line-height: 57px; vertical-align: middle; float: left; padding: 0px 20px 0px 30px; margin: 0 0 0 5px;}
.mbtbar .subicons .fbicon{border-right: 1px solid #e6e6e6; background: url(https://blogger.googleusercontent.com/img/b/R29vZ2xl/AVvXsEgYhXodqsvilbBs45vP-icLC3IZZe9xUZoNK1AxESplJmNI8BIaLDGxIyZ_KUb_Q8qf6qtUn3x2CK7y88T_rqxvrt9BYpQVK2uRyLXo0BHePXxMY8Awutx8aj7GwbbU2sXASlPJ4PR99zQ/s400/facebook.png) no-repeat left center; min-width: 20px; height: 48px; line-height: 57px; vertical-align: middle; float: left; padding: 0px 20px 0px 30px; margin: 0 0 0 5px;}
.mbtbar .subicons .twittericon{background: url(https://blogger.googleusercontent.com/img/b/R29vZ2xl/AVvXsEjy5QJiGRlHKwUXOJxaBgnIVTY8QYB_226f3uy4Fqf68tmsDvWuYeh7PWDfApVF7ajrj00u2vfSe2n433qLFre4i_dZ9yZhHI5FlozWc4Y1RA6WrAmtzGV7QJ4AmsYjwjFJNU7H4tYL7Vk/s400/twitter.png) no-repeat left center; min-width: 20px; height: 48px; line-height: 57px; vertical-align: middle; float: left; padding: 0px 20px 0px 30px; margin: 0 0 0 5px;}
.mbtbar .emailsub{border-bottom: 1px solid #e6e6e6; padding: 15px 0 20px 0; float: left; width: 100%; font-family: Helvetica, Arial;}
.mbtbar .emailsub .emailicon{background: url(https://blogger.googleusercontent.com/img/b/R29vZ2xl/AVvXsEiLQdnXxCo6sefdpKvUCy0czGXg4D-1YjFF5k89jAzd2f6VYjnd1CpxKyX4K729NLTr3dkGLNoBowgV5PlzcisGuJ9pQMPlOdctwTnW4gKiJbcYL7FnSExKjnr_JUm4O9bfxUYne60kW9U/s400/email.png) no-repeat left center; float: left; padding: 5px 15px 0px 35px; margin: 0 0 0 5px; width: 300px; height: 28px; line-height: 28px; vertical-align: middle; font-size: 14px; color: #333; }
.mbtbar .emailsub .emailupdatesform{margin: 15px 0 5px 5px; width: 300px; float: left;}
.mbtbar .emailsub .emailupdatesform input.emailupdatesinput{background: #fff !important; float: left; border: 1px solid #d2d2d2; padding: 0px 8px 0px 8px; color: #a19999; font-size: 12px; height: 25px; width: 200px; -moz-border-radius: 5px; -webkit-border-radius: 5px;}
.mbtbar .emailsub .emailupdatesform input.joinemailupdates{background:-moz-linear-gradient(top,#57ABFE 0%,#0080ff 100%); background:-webkit-gradient(linear,left top,left bottom,from(#57ABFE),to(#0080ff)); border: 1px solid #0080ff; text-transform: uppercase; color: #fff; height: 25px; padding: 0 12px 0 12px; margin: 0 0 0 5px; -moz-border-radius: 5px; -webkit-border-radius: 5px;}
</style>
<!--[if IE 7]>
<style>
.mbtbar .count span.bigcount{color:#F17C18; font-size: 24px; font-family: Helvetica, Arial; line-height: 34px; vertical-align: middle; }
.mbtbar .emailsub .emailupdatesform input.joinemailupdates{background:#0080ff; border: 1px solid #0080ff; text-transform: uppercase; color: #ffffff; font-weight:bold; height: 25px; padding: 0 12px 0 12px; margin: 0 0 0 5px; }
</style>
<![endif]-->
<div class="mbtbar"><div class="count">Join <span class="bigcount">1675+</span> People Following MBT</div><div class="subicons"><div class="rssicon"><a href="http://www.mybloggertricks.com/feeds/posts/default" target="_blank">RSS</a></div><div class="fbicon"><a href="http://www.facebook.com/pages/My-Blogger-Tricks/147104632016744" target="_blank" rel="nofollow">Facebook</a></div><div class="twittericon"><a href="http://twitter.com/mybloggertricks" target="_blank" rel="nofollow">Twitter</a></div></div>
<div class="emailsub">
<div class="emailicon">Stay Updated via Email Newsletter</div>
<div class="emailupdatesform">
<form action="http://feedburner.google.com/fb/a/mailverify" method="post" target="popupwindow" onsubmit="window.open('http://feedburner.google.com/fb/a/mailverify?uri=tntbystc', 'popupwindow', 'scrollbars=yes,width=550,height=520');return true"><input gtbfieldid="10" class="emailupdatesinput" name="email" value="Enter your email..." onblur="if (this.value == &#39;&#39;) {this.value = &#39;Enter your email...&#39;;}" onfocus="if (this.value == &#39;Enter your email...&#39;) {this.value = &#39;&#39;;}" type="text" /><input value="tntbystc" name="uri" type="hidden" /><input value="Join" class="joinemailupdates" type="submit" /></form></div></div></div>

   4.  Save the widget and you are done!

How To Style and Edit the Widget?

Follow these,
  • To Change the the Blue Colour of the Submit button Change #57ABFE to a Light shade and this #0080ff to a dark shade. Our Colour Generator Can help in this case.
  • Replace 1675+ with your Feed count and always update it manually once a week. To change its colour edit this #F17C18 
  • Replace http://www.mybloggertricks.com/feeds/posts/default with your feedburner RSS Feed link.
  • Replace http://www.facebook.com/pages/My-Blogger-Tricks/147104632016744 with your Facebook profile  Link
  • Replace http://twitter.com/mybloggertricks with your twitter profile link
  • Replace http://feedburner.google.com/fb/a/mailverify?uri=tntbystc with your feedburner RSS Email Link
  • Replace tntbystc with the Feedburner RSS Email Title which is always written at the end of your FEED Email Link as shown below,
http://feedburner.google.com/fb/a/mailverify?uri=tntbystc

How did you like it?

I would be really pleased to hear about your suggestions and feedback. If you faced any trouble then do not panic and let me know :>
I would appreciate MBT regular readers to kindly advise me whether or not to change MBT's  current Feed Form with this new one because I personally like this new design. =)

Subscription Email Form For Blogger Equipped With RSS Feed


Blogger-Subscription-Form

I am extremely sorry for delaying this post. Due to burden of studies I was finding it difficult to publish posts but now everything is fine. Now without wasting your time lets jump straight to the tutorial of adding a beautiful Subscription form to the sidebars of your BlogSpot blogs.

Before Proceeding make sure you have burnt your feeds at www.feedburner.com
Now do the following,
  1. Go To Blogger > Layout
  2. Click Add a Gadget or Add a Page element
  3. Choose HTML/JavaScript Widget
  4. Inside this widget paste the code below,
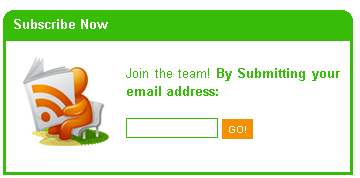
<a href="http://feeds2.feedburner.com/TntByStc" rel="alternate" title="Subscribe now to avail the unthinkable" type="application/rss+xml"><img border="0" alt="" style=" padding-bottom:20px; margin: 0pt 10px 10px 0pt; float: left; width:100px; height:100px;" src="https://blogger.googleusercontent.com/img/b/R29vZ2xl/AVvXsEjDXkHWrttPPXviNXJ_87c5s63cYL9RD2YMXIbaToBAoldARuUGDv2sLNIunb5gd335GhJo5Xpk8ZEgU4UHhGI-l_Vst2EAUZqDTPhav8A66OpZWSkZkjAxAwRMTTzRMCrKhmQIk8ubo-Bs/s400/MBT-RSS-FEED.gif"/></a><p><a href="http://feeds2.feedburner.com/TntByStc" rel="alternate" title="Subscribe to my feed" type="application/rss+xml">Join the team! </a><span style="color: #5C6AA4; font-weight: bold;">By Submitting your email address:</span></p>
<style>
input.mbt1 {
color:#fff;
font: bold 10px Arial, sans-serif;
background:#F39100;
border:0;
padding:3px;
}
input.mbt1hov {
color:#fff;
font: bold 10px Arial, sans-serif;
border:2px solid #F39100;
padding:3px;
}
</style>
<form action="http://feedburner.google.com/fb/a/mailverify" style="padding: 5px; " target="popupwindow" method="post" onsubmit="window.open('http://feedburner.google.com/fb/a/mailverify?uri=TntByStc', 'popupwindow', 'scrollbars=yes,width=550,height=520');return true"><input style=" color:#5C6AA4; background: #fff; border:1px solid #5C6AA4; width: 90px;" name="email" type="text"/><input value="TntByStc" name="uri" type="hidden"/><input value="en_US" name="loc" type="hidden"/> <input onmouseover="this.className='mbt1 mbt1hov'" onmouseout="this.className='mbt1'" value="GO!" class="mbt1" type="submit"/></form><br/>
Now you need to make some important changes to customize the widget.
  • Replace http://feeds2.feedburner.com/TntByStc with your Feed URL that Feedburner has provided you. If you don’t now how to get it simple replace TntByStc with your Feed title like this,
http://feeds2.feedburner.com/Paste-Your-Feed-Title-here

  • To use a different RSS Feed Icon simple change the URL below with that of yours,
https://blogger.googleusercontent.com/img/b/R29vZ2xl/AVvXsEjDXkHWrttPPXviNXJ_87c5s63cYL9RD2YMXIbaToBAoldARuUGDv2sLNIunb5gd335GhJo5Xpk8ZEgU4UHhGI-l_Vst2EAUZqDTPhav8A66OpZWSkZkjAxAwRMTTzRMCrKhmQIk8ubo-Bs/s400/MBT-RSS-FEED.gif
  • Replace TntByStc with your own Feedburner Feed Title
  • The Color code #5C6AA4 refers to the text colour and border colour of the Subscription Box. May be MBT Color Chart will help you. If you are using MBT Buster Themes than change the colours as follows,
               For Buster Theme 1 leave the code #5C6AA4 unchanged.
               For Buster Theme 2 replace #5C6AA4 with #64A6E4
               For Buster Theme 3 replace #5C6AA4 with #37BD07
               For Buster Theme 4 replace #5C6AA4 with #7CA2C4
               If you are using MBT Church Theme then replace #5C6AA4 with #7CA2C4
That’s it. Hit Save and Preview Your Widget!
I hope it was simple to understand :|

Create a Cute Subscription Form

Subscription-form I have already shared many tutorials on RSS Subscription forms such as Subscription Email Form and Subscription Feed Widget and today we have yet another but extremely beautiful and easy to edit subscription form dozed with new CSS effects. This widget will keep your sidebar neat and clean and will surely attract visitors to subscribe.
Live Demo

How To Add this Subscription Form To Blogger?

  1. Go To Blogger > Design > Page Elements
  2. Choose HTML JavaScript Widget
  3. Paste the following code in it,
<style>
.mbt-email{
background:url(https://blogger.googleusercontent.com/img/b/R29vZ2xl/AVvXsEjgWoQkfVSoEczSyRUQ_dF3_kdqNfoV7e8SYoR_VzMPbA54KIboIyBDKXvpU2spS2PgUgbc5vXp-FjX0sDA-muGVq4TUghy21kyP_eLxmD5Tlok3UVj6-P1ZgHvdL2XYTPlswIxZ5gfL5O2/s1600/email.png) no-repeat 0px 12px ;
width:300px;
padding:10px 0 0 55px;
float:left;
font-size:1.4em;
font-weight:bold;
margin:0 0 10px 0;
color:#686B6C;
}
.mbt-emailsubmit{
background:#9B9895;
cursor:pointer;
color:#fff;
border:none;
padding:3px;
text-shadow:0 -1px 1px rgba(0,0,0,0.25);
-moz-border-radius:6px;
-webkit-border-radius:6px;
border-radius:6px;
font:12px sans-serif;
}
.mbt-emailsubmit:hover{
background:#E98313;
}
.textarea{
padding:2px;
margin:6px 2px 6px 2px;
background:#f9f9f9;
border:1px solid #ccc;
resize:none;
box-shadow:inset 1px 1px 1px rgba(0,0,0,0.1);
-moz-box-shadow:inset 1px 1px 1px rgba(0,0,0,0.1);
-webkit-box-shadow:inset 1px 1px 1px rgba(0,0,0,0.1); font-size:13px;  
width:170px;
color:#666;}
</style>
<div class="mbt-email">
Subscribe via Email <form action="http://feedburner.google.com/fb/a/mailverify" id="feedform" method="post" target="popupwindow" onsubmit="window.open('http://feedburner.google.com/fb/a/mailverify?uri=TntByStc', 'popupwindow', 'scrollbars=yes,width=550,height=520');return true">
<input gtbfieldid="3" class="textarea" name="email" onblur="if (this.value == &quot;&quot;) {this.value = &quot;Enter email address here&quot;;}" onfocus="if (this.value == &quot;Enter email address here&quot;) {this.value = &quot;&quot;;}" value="Enter email address here" type="text" />
<input type="hidden" value="TntByStc" name="uri"/><input type="hidden" name="loc" value="en_US"/>
<input class="mbt-emailsubmit" value="Submit" type="submit" />
</form>
</div>


Now make these changes,
  • Now replace http://feedburner.google.com/fb/a/mailverify?uri=TntByStc with your Feedburner Email Feed link. You can get it by visiting your feedburner account then navigate to Publicize and then to Email Subscriptions.
  • Replace TntByStc with your feed title. It appear at the end of your feed link. In my case it is http://feedburner.google.com/fb/a/mailverify?uri=TntByStc
Save your widget and view your blog to see it showcasing live! :)
That’s All!
Do let me know if you needed any help in customizing the widget.

Multi Column Footer Widget For Blogger –The Hot!

Multi-Column-Footer Widget For Blogger
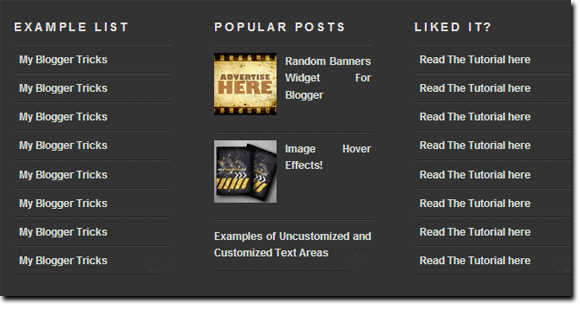
We had previously shared a tutorial on Three Column Footer Widget which was well appreciated and today we have yet another more advanced version of the same widget. This new widget can become three column, four column or with as many columns as you wish. Further this new footer widget has some great CSS effects added to it which makes it even better. First see a demo to know what’s so different about it.
See the widget at the bottom of the following Demo blog,
Live Demo

How To Add the Multi Column Footer Widget To Blogger?

First we will add the CSS code to your blogger templates and then the HTML. So without wasting any time lets jump straight to the steps,
  1. Go To Blogger > Design > Edit HTML
  2. Backup Your Template
  3. Search for ]]></b:skin>
  4. Just above ]]></b:skin> paste the code below,
/*----- MBT MULTI COLUMN FOOTER WIDGET -----*/
#lower {
margin:auto;
padding: 0px 0px 10px 0px;
width: 100%;
background:#333333;
}
#lower-wrapper {
background:#333333;
margin:auto;
padding: 20px 0px 20px 0px;
width: 960px;
border:0;
}
#lowerbar-wrapper {
background:#333333;
float: left;
margin: 0px 5px auto;
padding-bottom: 20px;
width: 23%;
text-align: justify;
color:#ddd;
font: bold 12px Arial, Tahoma, Verdana;
line-height: 1.6em;
word-wrap: break-word;
overflow: hidden;
}
.lowerbar {margin: 0; padding: 0;}
.lowerbar .widget {margin: 0; padding: 10px 20px 0px 20px;}
.lowerbar h2 {
margin: 0px 0px 10px 0px;
padding: 3px 0px 3px 0px;
text-align: left;
border:0;
color:#ddd;
text-transform:uppercase;
font: bold 14px Arial, Tahoma, Verdana;
}
.lowerbar ul {
color:#fff;
margin: 0 auto;
padding: 0;
list-style-type: none;
}
.lowerbar li {
display:block;
color:#fff;
line-height: 1.6em;
margin-left: 0 !important;
padding: 6px;
border-bottom: 1px solid #222;
border-top: 1px solid #444;
list-style-type: none;
}
.lowerbar li a {
text-decoration:none; color: #DBDBDB;
}
.lowerbar li a:hover {
text-decoration:underline;
}
.lowerbar li:hover {
display:block;
background: #222;
}

       5.    Now search for </body> and paste the following code just above </body>

<div id='lower'>
<div id='lower-wrapper'>

<div id='lowerbar-wrapper'>
<b:section class='lowerbar' id='lowerbar1' preferred='yes'>
</b:section>
</div>

<div id='lowerbar-wrapper'>
<b:section class='lowerbar' id='lowerbar2' preferred='yes'>
</b:section>
</div>

<div id='lowerbar-wrapper'>
<b:section class='lowerbar' id='lowerbar3' preferred='yes'>
</b:section>
</div>

<div id='lowerbar-wrapper'>
<b:section class='lowerbar' id='lowerbar4' preferred='yes'>
</b:section>
</div>


<div style='clear: both;'/>
</div> </div>
      6.   Save your template and you are done!
Now go to Page Elements and add your widgets to the newly added Footer Widget that will look something like this,
image
You can observe that there a total of four columns by default and you can add as many widgets as you want to each column. If you wish to increase or decrease the number of vertical columns then follow the steps below.

How to Customize the Widget?

Well I will keep it simple. I think the colors and overall size and padding and margining are just perfect. The only thing that you will need to adjust according to your template is the width of the widget and the number of vertical columns.
1.  In order to reduce or increase the overall width of the widget simply change width: 960px;
2.  If you wish to decrease the number of widgets to three then simply delete this part of the code,
<div id='lowerbar-wrapper'>
<b:section class='lowerbar' id='lowerbar4' preferred='yes'>
</b:section>
</div>

3.  Or if you wish to add an extra column then add the code below just above <div style='clear: both;'/>
<div id='lowerbar-wrapper'>
<b:section class='lowerbar' id='lowerbar#' preferred='yes'>
</b:section>
</div>
Remember that lowerbar# refers to the column number. So if you want to add a fifth column then simply replace  lowerbar# with lowerbar5.
After you have added the fifth column then remember to change width: 23%; with width: 17%;
You will repeat step 3 for as many columns as you wish to create. But three and four and five columns are a standard. Increasing them will make things look ugly.

That’s it! Enjoy :D
Wishing you all a Happy New Year 2011 full of love, joy and just Happiness. Peace and blessings :)

Add a Customized Three Column Footer Widget In Blogger

Three-Column-Footer You might have seen a three column widget at the bottom section of many commercial and professional blogs. Where you can add whatever stuff you like. Take my footer widget as an example. I have added widgets that further keeps the reader busy. This Footer widget contains three columns where each column can accommodate as many widgets as you can add! In order to add such a widget to the bottom section of your blogs and also customize the look and feel of it then lets start learning today’s tutorial.
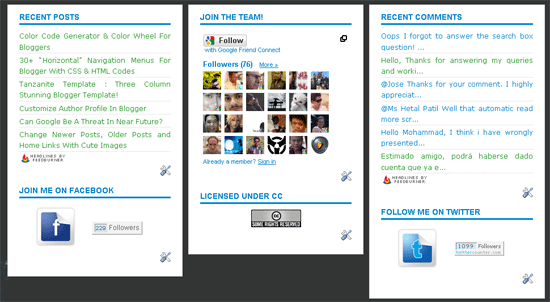
See a screenshot, Three-Column-Footer-Widget

Add This Three Column Widget Inside Your Blogger Templates

Follow these steps,
  1. Go To Blogger > Layout > Edit HTML
  2. Back Up your template
  3. Search for ]]></b:skin>
  4. Just before ]]></b:skin> paste this CSS code,
/* -----   LOWER SECTION   ----- */
#lower {
       margin:auto;
       padding: 0px 0px 10px 0px;
       width: 100%;
       background:#333434;
#lower-wrapper {
       margin:auto;
       padding: 20px 0px 20px 0px;
       width: 960px;
}
#lowerbar-wrapper {
     border:1px solid #DEDEDE;
      
background:#fff;        float: left;
       margin: 0px 5px auto;
       padding-bottom: 20px;
       width: 32%;        text-align: justify;
       font-size:100%;
       line-height: 1.6em;
       word-wrap: break-word; 
       overflow: hidden;
}

       .lowerbar {margin: 0; padding: 0;}
       .lowerbar .widget {margin: 0; padding: 10px 20px 0px 20px;}
.lowerbar h2 {
      margin: 0px 0px 10px 0px;
       padding: 3px 0px 3px 0px;
       text-align: left;
       color:#0084ce;         text-transform:uppercase;
      font: bold 14px Arial, Tahoma, Verdana;        border-bottom:3px solid #0084ce; }
.lowerbar ul {
      margin: 0px 0px 0px 0px;
      padding: 0px 0px 0px 0px;
      list-style-type: none;
}
.lowerbar li {
      margin: 0px 0px 2px 0px;
      padding: 0px 0px 1px 0px;
      border-bottom: 1px dotted #ccc;
}


    5.   Now Search For </body> and just above this code paste the code below,
<div id='lower'>
<div id='lower-wrapper'>
<div id='lowerbar-wrapper'>
<b:section class='lowerbar' id='lowerbar1' preferred='yes'>
</b:section>
</div>
<div id='lowerbar-wrapper'>
<b:section class='lowerbar' id='lowerbar2' preferred='yes'>
</b:section>
</div>
<div id='lowerbar-wrapper'>
<b:section class='lowerbar' id='lowerbar3' preferred='yes'>
</b:section>
</div>
<div style='clear: both;'/>
</div> </div>


6.  Save your template. done!
Now visit the page Layout > Page Elements and start adding widgets! :>>

Customization

You can easily customize the look and colours of the this footer widget. I have bolded the important parts in the CSS code above. Read the descriptions below carefully to better stylize your three column widget. For changing colours use our advanced Colour Code Generator
  • background:#333434;   Changing the six digit colour code will change the background colour of this widget.
  • width: 960px;  This is the width of the widget. If you want you can adjust this width value in accordance with the width of your blog.
  • background:#fff;  and    width: 32%; is the background colour and width of the three columns where the widgets are added.
  • color:#0084ce; This is the Colour of Title Headings
  • font: bold 14px Arial, Tahoma, Verdana;  Edit this to change the font size and family.
  • border-bottom:3px solid #0084ce;   Edit this to change the thickness, style and colour of the border that appears at the bottom of Title Heading
  • border-bottom: 1px dotted #ccc; Editing this will change the size, style and colour of the border that appears below links.
That’s All!
A tutorial on Four Column Footer widget will be posted soon. Till then keep playing with this one :> Do let me know if you needed help. Your questions are more than an honor!
Best Blogger Gadgets