73D41416194E8A7C390936971FB2B74B Chira Sathi

Friday, September 30, 2011

Related Posts Widget For Blogger - Optimized Version

related posts widgetDisplay thumbnails of posts having same labels or categories at the bottom of each blog page engages the reader more and increases the pageviews. By far we have two best related posts gadgets created so far one is by linkwithin which I am sharing in this tut and another one displays just links and I will share it in my next post. This widget Loads fast and you don't need to install any scripts for this as the widget codes are stored on linkwithin servers. This tutorial is the most detailed one ever written on linkwithin so kindly follow the steps carefully. Please see a demo first,
Live Demo

Add Linkwithin to Blogger

The steps are very simple:
  1. Go To Linkwithin
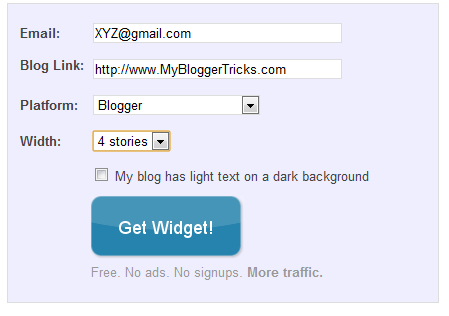
  2. Fill up the easy blanks and do as they say. The screenshot below will help,
related posts
  3.   Keep the width to three stories i.e three thumbnails if your post width is less than 500px
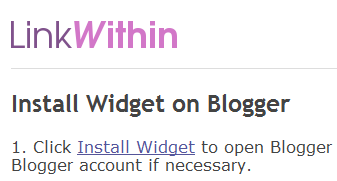
  4.   Hit the Get Widget button and then click the Install Widget link on the next page as shown below,
related posts linkwithin
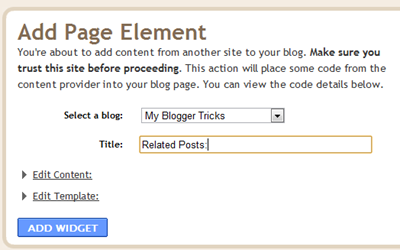
  5.   Change the Title to Related Posts: or anything you may like as shown below,
related posts widget
  6.  Now Click the Edit Template Link
related posts widget
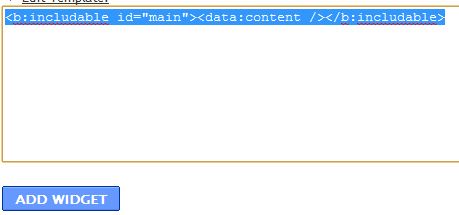
  7.   Replace the code that you see with this one:
<b:includable id='main'><b:if cond='data:blog.pageType == &quot;item&quot;'><data:content/></b:if></b:includable>
The above code will hide the thumbnails from appearing on homepage.
  8.   Next click the Edit Content Link and add the following additional code just above the code inside the widget,
<script>linkwithin_text='Related Posts:'</script>
Replace Related Posts:  with any text you want.
   9.  Finally hit the ADD WIDGET button.
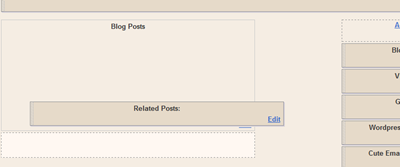
  9.  Once you are taken to the Page Elements page of your blogger account, simply drag the widget to the bottom of your post body as shown below,
related posts
   10.  Click the "Save" orange button at the top-right corner and you are done!
Let me know if you needed any further help on this. I hope the slight customization may prove helpful to you. Peace.


Feedburner Recent Posts Widget For Blogger

Feedburner Recent Post Widget You might have seen recent post widget hanging on the sidebar of several blogs but most often this widgets have a JavaScript Code in it that badly increases the load time of your page. Today we will learn how to add a Recent posts widget offered by  Feedburner to your blogs which is tidy, attractive, unique and most importantly fast loading.
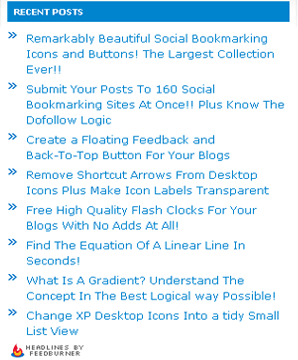
Let me tell you that Feedburner also uses JavaScript but it’s really smart when it comes to page Load time, because the JavaScript is not directly linked to your blog, 50% of the load time is shared by FeedBurner.
Feedburner Recent Posts Widget

Feedburner as you all know is the best web service for submitting your blog feed. Once you sign up with them they will provide you with several widgets like a Rotating Headlines Banner, Subscription Email form as you can see on my sidebar, a feed counter and most importantly a Recent Post widget like the one on my sidebar,
feedburner-recent-post-widg
These are steps you may follow,
1. Sign up for a Feedburner Account , which I hope you already have.
2. Log in your account and click on the Publicize button as shown below,
publicize
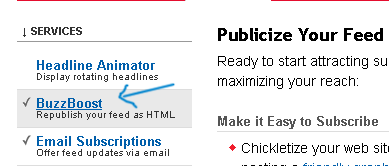
3. Then Click on BuzzBoost on the sidebar at your left.
buzzboost
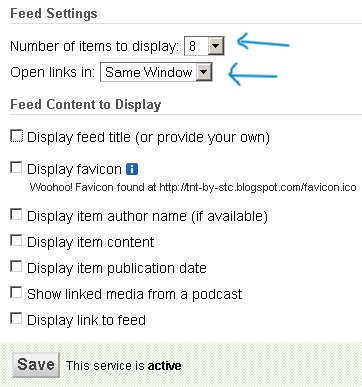
4. On the page that opens , you will see a small form,
feed-form
Fill the form with relevant information. Leave all Boxes unchecked. Keep the number of items (Links) as low as possible. You can choose 8 links to be displayed but 6 would be better. Choose Links to be opened in Same Window
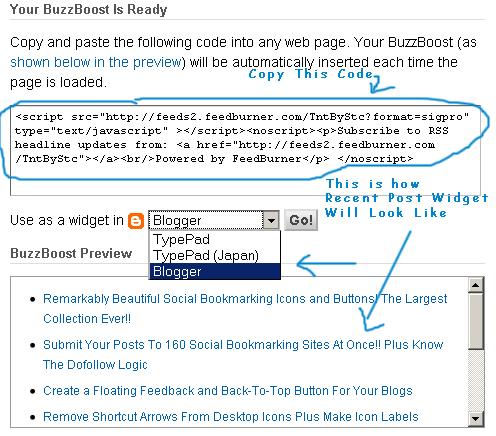
5. Now copy the code they provide you as shown below,
Copy-this-Code
6. Log in your blogger Account and then go to Layout > Page Elements
Layout
7. Select add a gadget and the choose HTML/JavaScript
add-a-gadget
html-javascript
8. Now Paste the code into the widget and give it a title “ Recent Posts”
9. Done!

To add a Twitter Recent Posts Widget to your blogs Click this -> Twitter Recent Post Widget
DO let me know whether you liked the Feedburner Widget or not?

Advanced Multi Tabbed Widget For Blogger – Fully Widgetized!

Step#6 has been updated. Repeat that step to get it working just perfect.
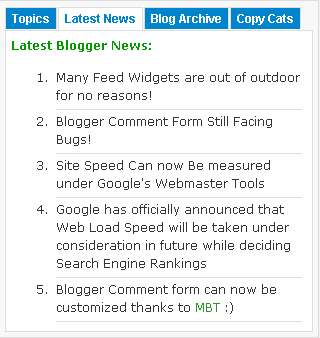
multi-tabbed-widget I had published a post on how to add a multi tab widget to your blogger blogs and how to customize it to suit your blog layout some months ago. The only problem with that widget is that it is not fully widgetized i.e you can not add archives, labels, author profile or other blogger official widgets to it unless you have their separate code with you. I just came across a beautiful and a more flexible and advanced tabber widget stylized by Lawny Designs and scripted by Barelyfitz. I have modified lawny’s tutorial and have made some changes to the code so to make it even more simpler to newbie bloggers. You can view this widget hanging on my sidebar.

To add this cute multi tab widget to your BlogSpot blogs follow these steps.
  1. Go to Blogger > Layout > Edit HTML
  2. Search For </head>
  3. And paste the code below just above it,
<script type='text/javascript'>
//<![CDATA[
document.write('<style type="text/css">.tabber{display:none;}<\/style>');
function tabberObj(argsObj)
{
  var arg;
  this.div = null;
  this.classMain = "tabber";
  this.classMainLive = "tabberlive";
  this.classTab = "tabbertab";
  this.classTabDefault = "tabbertabdefault";
  this.classNav = "tabbernav";
  this.classTabHide = "tabbertabhide";
  this.classNavActive = "tabberactive";
  this.titleElements = ['h2','h3','h4','h5','h6'];
  this.titleElementsStripHTML = true;
  this.removeTitle = true;
  this.addLinkId = false;
  this.linkIdFormat = '<tabberid>nav<tabnumberone>';
  for (arg in argsObj) { this[arg] = argsObj[arg]; }
  this.REclassMain = new RegExp('\\b' + this.classMain + '\\b', 'gi');
  this.REclassMainLive = new RegExp('\\b' + this.classMainLive + '\\b', 'gi');
  this.REclassTab = new RegExp('\\b' + this.classTab + '\\b', 'gi');
  this.REclassTabDefault = new RegExp('\\b' + this.classTabDefault + '\\b', 'gi');
  this.REclassTabHide = new RegExp('\\b' + this.classTabHide + '\\b', 'gi');
  this.tabs = new Array();
  if (this.div) {
    this.init(this.div);
    this.div = null;
  }
}
tabberObj.prototype.init = function(e)
{
  var
  childNodes,
  i, i2,
  t,
  defaultTab=0,
  DOM_ul,
  DOM_li,
  DOM_a,
  aId,
  headingElement;
  if (!document.getElementsByTagName) { return false; }
  if (e.id) {
    this.id = e.id;
  }
  this.tabs.length = 0;
  childNodes = e.childNodes;
  for(i=0; i < childNodes.length; i++) {
    if(childNodes[i].className &&
       childNodes[i].className.match(this.REclassTab)) {
      t = new Object();
      t.div = childNodes[i];
      this.tabs[this.tabs.length] = t;
      if (childNodes[i].className.match(this.REclassTabDefault)) {
    defaultTab = this.tabs.length-1;
      }
    }
  }
  DOM_ul = document.createElement("ul");
  DOM_ul.className = this.classNav;
  for (i=0; i < this.tabs.length; i++) {
    t = this.tabs[i];
    t.headingText = t.div.title;
    if (this.removeTitle) { t.div.title = ''; }
    if (!t.headingText) {
      for (i2=0; i2<this.titleElements.length; i2++) {
    headingElement = t.div.getElementsByTagName(this.titleElements[i2])[0];
    if (headingElement) {
      t.headingText = headingElement.innerHTML;
      if (this.titleElementsStripHTML) {
        t.headingText.replace(/<br>/gi," ");
        t.headingText = t.headingText.replace(/<[^>]+>/g,"");
      }
      break;
    }
      }
    }
    if (!t.headingText) {
      t.headingText = i + 1;
    }
    DOM_li = document.createElement("li");
    t.li = DOM_li;
    DOM_a = document.createElement("a");
    DOM_a.appendChild(document.createTextNode(t.headingText));
    DOM_a.href = "javascript:void(null);";
    DOM_a.title = t.headingText;
    DOM_a.onclick = this.navClick;
    DOM_a.tabber = this;
    DOM_a.tabberIndex = i;
    if (this.addLinkId && this.linkIdFormat) {
      aId = this.linkIdFormat;
      aId = aId.replace(/<tabberid>/gi, this.id);
      aId = aId.replace(/<tabnumberzero>/gi, i);
      aId = aId.replace(/<tabnumberone>/gi, i+1);
      aId = aId.replace(/<tabtitle>/gi, t.headingText.replace(/[^a-zA-Z0-9\-]/gi, ''));
      DOM_a.id = aId;
    }
    DOM_li.appendChild(DOM_a);
    DOM_ul.appendChild(DOM_li);
  }
  e.insertBefore(DOM_ul, e.firstChild);
  e.className = e.className.replace(this.REclassMain, this.classMainLive);
  this.tabShow(defaultTab);
  if (typeof this.onLoad == 'function') {
    this.onLoad({tabber:this});
  }
  return this;
};
tabberObj.prototype.navClick = function(event)
{
  var
  rVal,
  a,
  self,
  tabberIndex,
  onClickArgs;
  a = this;
  if (!a.tabber) { return false; }
  self = a.tabber;
  tabberIndex = a.tabberIndex;
  a.blur();
  if (typeof self.onClick == 'function') {
    onClickArgs = {'tabber':self, 'index':tabberIndex, 'event':event};
    /* IE uses a different way to access the event object */
    if (!event) { onClickArgs.event = window.event; }
    rVal = self.onClick(onClickArgs);
    if (rVal === false) { return false; }
  }
  self.tabShow(tabberIndex);
  return false;
};
tabberObj.prototype.tabHideAll = function()
{
  var i;
  for (i = 0; i < this.tabs.length; i++) {
    this.tabHide(i);
  }
};
tabberObj.prototype.tabHide = function(tabberIndex)
{
  var div;
  if (!this.tabs[tabberIndex]) { return false; }
  div = this.tabs[tabberIndex].div;
  if (!div.className.match(this.REclassTabHide)) {
    div.className += ' ' + this.classTabHide;
  }
  this.navClearActive(tabberIndex);
  return this;
};
tabberObj.prototype.tabShow = function(tabberIndex)
{
  var div;
  if (!this.tabs[tabberIndex]) { return false; }
  this.tabHideAll();
  div = this.tabs[tabberIndex].div;
  div.className = div.className.replace(this.REclassTabHide, '');
  this.navSetActive(tabberIndex);
  if (typeof this.onTabDisplay == 'function') {
    this.onTabDisplay({'tabber':this, 'index':tabberIndex});
  }
  return this;
};
tabberObj.prototype.navSetActive = function(tabberIndex)
{
  this.tabs[tabberIndex].li.className = this.classNavActive;
  return this;
};
tabberObj.prototype.navClearActive = function(tabberIndex)
{
  this.tabs[tabberIndex].li.className = '';
  return this;
};
function tabberAutomatic(tabberArgs)
{
  var
    tempObj,
    divs,
    i;
  if (!tabberArgs) { tabberArgs = {}; }
  tempObj = new tabberObj(tabberArgs);
  divs = document.getElementsByTagName("div");
  for (i=0; i < divs.length; i++) {
    if (divs[i].className &&
    divs[i].className.match(tempObj.REclassMain)) {
      tabberArgs.div = divs[i];
      divs[i].tabber = new tabberObj(tabberArgs);
    }
  }
  return this;
}
function tabberAutomaticOnLoad(tabberArgs)
{
  var oldOnLoad;
  if (!tabberArgs) { tabberArgs = {}; }
  oldOnLoad = window.onload;
  if (typeof window.onload != 'function') {
    window.onload = function() {
      tabberAutomatic(tabberArgs);
    };
  } else {
    window.onload = function() {
      oldOnLoad();
      tabberAutomatic(tabberArgs);
    };
  }
}
/* Run tabberAutomaticOnload() unless the "manualStartup" option was specified */
if (typeof tabberOptions == 'undefined') {
    tabberAutomaticOnLoad();
} else {
  if (!tabberOptions['manualStartup']) {
    tabberAutomaticOnLoad(tabberOptions);
  }
}
//]]>
</script>


4.  Now search for ]]></b:skin>  and just above it paste this code,
/*---------- Tabber Start-------- */

.tabberlive{
margin:0;
padding:5px;
clear:both;
background:$tbbxbgcolor;
border:1px solid $tbbxbrcolor;
}
.tabbernav {
margin:0;
padding: 3px 0;
border-bottom: 1px solid $tbbxbrcolor;
font-family:Arial,Helvetica,sans-serif;
font-size:12px;
font-weight:bold;
}
.tabbernav li {
list-style:none;
margin:0;
display:inline;
}
.tabbernav li a {
padding:3px 0.5em;
margin-right:1px;
border:1px solid $tbbxbrcolor;
border-bottom:none;
background:$tbbxcolor2;
text-decoration:none;
color:$tbbxcolor1;
}
.tabbernav li a:hover {
color:$tbbxcolor2;
background:$tbbxcolor1;
border-color:$tbbxbrcolor;
text-decoration:none;
}
.tabbernav li.tabberactive a,
.tabbernav li.tabberactive a:hover {
background:$tbbxcolor1;
color:$tbbxcolor2;
border-bottom: 1px solid $tbbxcolor1;
}
.tabberlive .tabbertab {
padding:5px;
border:1px solid $tbbxbrcolor;
border-top:0;
background:$tbbxcolor1;
}
.tabberlive .tabbertab h2,
.tabberlive .tabbertabhide {
display:none;
}
.tabbertab .widget-content ul{
list-style:none;
margin:0 0 10px 0;
padding:0;
}
.tabbertab .widget-content li {
border-bottom:1px solid $tbbxbrcolor;
margin:0 5px;
padding:2px 0 5px 0;
}

/*------- Tabber End--------*/

5.  Don’t save your template. Now search for Variable definitions and paste this code with other variable definitions,
<Variable name="tbbxbgcolor" description="Tab box Background Color" type="color" default="#f8f8f8" value="#f8f8f8">
<Variable name="tbbxbrcolor" description="Tab box Border Color" type="color" default="#dcdcdc" value="#dcdcdc">
<Variable name="tbbxcolor1" description="Tab box Color 1" type="color" default="#ffffff" value="#ffffff">
<Variable name="tbbxcolor2" description="Tab box Color 2" type="color" default="#5588aa" value="#5588aa">


If you can’t find Variable definitions  then search for #navbar-iframe and paste this code below #navbar-iframe { Some text here }
/* Variable definitions
   ====================
<Variable name="tbbxbgcolor" description="Tab box Background Color" type="color" default="#f8f8f8" value="#f8f8f8">
<Variable name="tbbxbrcolor" description="Tab box Border Color" type="color" default="#dcdcdc" value="#dcdcdc">
<Variable name="tbbxcolor1" description="Tab box Color 1" type="color" default="#ffffff" value="#ffffff">
<Variable name="tbbxcolor2" description="Tab box Color 2" type="color" default="#5588aa" value="#5588aa">

*/

UPDATED PART:
6.   Now the final part. Search for <div id='sidebar-wrapper'> and paste this code just below it,
<div style='clear:both;'/>
<div class='tabber'>
<b:section class='tabbertab' id='tab1' maxwidgets='1'/>
<b:section class='tabbertab' id='tab2' maxwidgets='1'/>
<b:section class='tabbertab' id='tab3' maxwidgets='1'/>
<b:section class='tabbertab' id='tab4' maxwidgets='1'/>

</div>


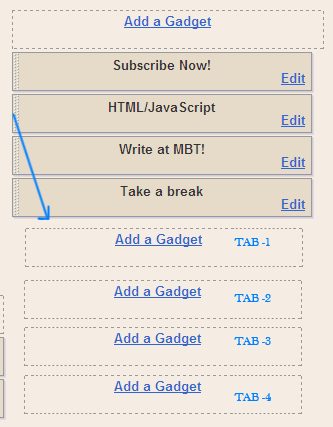
7. Finally save your template and visit Layout > Page Elements to start adding widgets to the tabs! It will look something like this,
MULTI-TABBED-WIDGET
The widgets are arranged number wise. Starting from Tab-1 and ending at Tab-4. To add a gadget/widget to any tab simply click the link Add a Gadget and start adding whatever you want.
8. Finally view your template to see it hanging!:)

Customization Guide To Multi Tab Widget

Here we will discuss how to change the Look and position of this multi tabbed widget.
Changing Position:
To shift this tabber widget to the bottom section of your sidebar rather at the extreme top, do this,
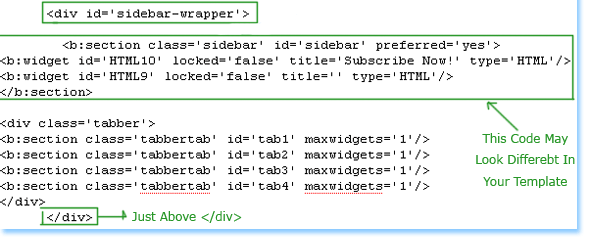
  • Paste the code in Step#6 just above </div> and not just below <div id='sidebar-wrapper'> As shown in the image below,
Shift-position-of-tabber
  • Save your template and go to Layout > Page Elements  to see if it has shifted to the bottom.
Changing Look and Feel:
  • The background colours of the widget can be changed by editing the code in step#5. I am rewriting the code here with some description.
<Variable name="tbbxbgcolor" description="Tab box Background Color" type="color" default="#f8f8f8" value="#f8f8f8">

<Variable name="tbbxbrcolor" description="Tab box Border Color" type="color" default="#dcdcdc" value="#dcdcdc">

<Variable name="tbbxcolor1" description="Tab box Color 1" type="color" default="#ffffff" value="#ffffff">

<Variable name="tbbxcolor2" description="Tab box Color 2" type="color" default="#289728" value="#289728">

This code has four main sections amongst which the sections tbbxcolor1: and  tbbxcolor2: are the most important. I will describe each one in detail.
Important Sections:
tbbxcolor1: This is an important section. It defines the background colour of this multi tab widget and also the colour on mouse hover. The default colour is white i.e #ffffff
tbbxcolor2: This refers to the background colour of the tabs and the text inside the tabs. the default colour is green. You can change the value #289728 to a different colour value using our color chart
Change these only if you wish:
tbbxbgcolor: This section refers to the background colour of the tab box. By default the colour is grey. If you wish to change it to a different colour simply change the hexadecimal colour value #f8f8f8 to something different using our Color Chart
tbbxbrcolor: This refers to the border line color across the tabs and the box.
That’s All!
I hope this widget will help a lot in giving a clean and neat touch to your blogs. Any question is welcomed :>

Best Blogger Gadgets