73D41416194E8A7C390936971FB2B74B Chira Sathi

Wednesday, September 28, 2011

How To Add Animated Favicon In Blogger?

add-faviconFavicon is actually the icon that appears next to your Website URL in the browser address bar. A favicon is usually your blog logo. There are many free services that help to create favicons for you but most of these services use still images. I have used an animated favicon for my blog as you can see in your address bar.  It actually consists of a logo and then my blog title as text. The image and text together makes a more beautiful combination. So lets jump at the tutorial and create an attractive  cute favicon for your blog,

How To Create Animated Favicons?


  1. Go To favicongenerator
  2. And just at the bottom of the page upload your blog logo or any icon you wish to make as your favicon and also add your blog title as the scrolling text. You will find all the help at favicongenerator
image
    3.  Hit the Generate Favicon Button and you will be taken to this page,
image
Here you will see many images just right click the animated one and save it to your computer.
     4. Now upload the image to your Picasa album by reading this post –> Store Animated Images in Blogger and Learn how to get Image URLs

How To Add Your Favicon To Blogger Now?

  1. Go To Blogger > Design > Edit HTML
  2. And Search For <b:skin> and just above it paste the code below,
<link href='ADD YOUR FAVICON LINK HERE' rel='icon' type='image/gif'/>
     3.  Replace ADD YOUR FAVICON LINK HERE with the image URL of the favicon you saved in Picasa album.
     4.  Save your template and you are done!
View your blog to see it in action on the address bar and tabs. Hope you liked it! Questions are always welcomed :>>

Add Floating Facebook Like and Retweet Counters To Your Websites

floating-sharing-widget
UPDATED:  Problem Solved now happily use the new working code :>
Since it is weekend so I thought lets  play with some CSS again. Facebook Like Button and retweet counter by tweetmeme are the two most widely used social media widgets without which you can’t call a blog a blog. Both these buttons along with Stumble Upon bookmarking button can let your readers circulate/share your tutorials and articles with their interested collegues and friends connected to them via these social networks. With a little HTML spiced with CSS we succeeded in creating a floating widget that will include these three buttons and will stay fixed at the middle lift side of your websites. The widget settings can surely be changed to align it to the right, bottom or left if you wish. You can also add more buttons to it if you wish like DIGG for instance.  See a demo first,

Live Demo

How To add Floating Facebook Like, Retweet and Stumble Upon Counter to Blogger?

  1. Go To Blogger > Design
  2. Select HTML/JavaScript Widget from anywhere (Position doesn’t matter)
  3. Inside it paste the code below,
    <div style="display:scroll; position:fixed; top:40%; left:2%; border: 1px dotted #E8E8E8; padding:0px 0px 0px  5px; height:220px; width:53px ">
    <table cellpadding="1px" cellspacing="0">
    <tr>
    <td style="border-bottom: 1px solid #E8E8E8; padding:5px 0 2px 0;"> 
    <div id='fb-root'/><script src='http://connect.facebook.net/en_US/all.js#xfbml=1'/><fb:like font='' href='' layout='box_count' send='false' show_faces='false'/>
    </td>
    </tr>
    <tr>
    <td style="border-bottom: 1px solid #E8E8E8; padding:5px 0px;">
    <script src="http://www.stumbleupon.com/hostedbadge.php?s=5"></script>
    </td>
    </tr>
    <tr>
    <td style="border-bottom: 0px solid #E8E8E8; padding:5px 0 0px 0;">
<a href="http://twitter.com/share" class="twitter-share-button" data-count="vertical" data-via="mybloggertricks">Tweet</a><script type="text/javascript" src="http://platform.twitter.com/widgets.js"></script>
    </td>
    </tr>
    </table>
    </div>

     4.    Simply replace mybloggertricks with your twitter username.
     5.    Save your widget and you are Done!

See your blog to find a light and beautiful widget hanging at left side of your blog. Hope you like it! :)

Customize Blogger Comment Form – Make It Possible!

Customize-Blogger-comment-form 
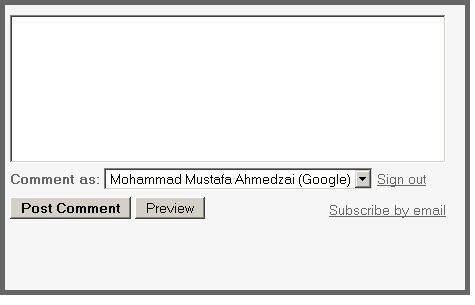
Today's tutorial is the most demanded and most wished but rarely answered in blogosphere. For some designers customizing the Blogger Comment Form is somehow not possible whilst for others it is tricky but from today onwards InshAllah every blogger will actually be able to customize the Blogger Comment Form in the best way possible! After some trial and errors we actually succeeded in altering Blogger’s official CSS coding. We are happy to have brought you with a tutorial that will indeed enable you to have a customized Comment Form far better than that of Wordpress, Typad etc. Please have a look at some examples below,
Brick Style Comment Form
Wooden Style Comment Form

Now Hover Your Mouse Cursor at these comment forms for 3-4 seconds to see something different!
Baby Comment Form with message for spammers
Simple Comment Form with message for spammers

Orange Comment Form with message for spammers
We hope you liked this new discovery! Lets now learn how to customize the blogger comment form/box to suit your preferences.

Adding A Customized Comment Form To Your Blog

Note:- The Following CSS code is for the Comment Form With a Baby in it. Other CSS codes will be provided to subscribers only. If you haven’t subscribed yet kindly subscribe now and inform us by leaving a comment with your Email ID.
Follow these steps,
  1. Go To Blogger > Layout > Edit HTML
  2. Check The Box “Expand Widget Templates” at the top right corner.
  3. Search for the code below,                                  Tip:- Press Ctrl + f
<div class='comment-form'>
     4.   Replace this code with the code below,
<div id='mbt-form'>
     5.   Now Search for ]]></b:skin>
     6.   Just above ]]></b:skin> paste the CSS code below,
#mbt-form iframe{
background:#ffffff url(https://blogger.googleusercontent.com/img/b/R29vZ2xl/AVvXsEhAqgCYvKDt9YUMVXXI34FJwuyy0Z4nuEMOKcSXW_5Qm5VJjQ2xCCUwPp8nzFfanT1-lKe6ILiEF1oL1C28xi676SJXm6GKB9X_XJmxgUk-7rCFAY92DVezZ6DpgeLJo5iKa2BimwEwkIZJ/s400/plz-do-not-spam1.gif) no-repeat bottom right;
border:7px solid #C7C7C7;
padding:5px; font:normal 12pt "ms sans serif", Arial; color:#7EB2AC; width:450px; }
#mbt-form iframe:hover{
background:#ffffff url(https://blogger.googleusercontent.com/img/b/R29vZ2xl/AVvXsEjXIWzVpz2XjHSGERZLUw-zQm4B-xEwneaK5EFEUYww1DlCB7XyiwWSx1Jr1lS5-Uqo2hiSWKMufY7LHYyr1sg5DO5Iqzu435Tp4xIlXTzlBp5LdZnG_oewBEqxKJVmI5j0xBhPijXxbj3T/s400/plz-do-not-spam2.gif) no-repeat bottom right; border:7px solid #7EB2AC;
}
#mbt-form a{
color:#7EB2AC;
}
     7.     Save your template and view your blog to see a different touch :>

Customize The Blogger Comment Form To Suit Your Blog Layout

Now Lets discuss the important areas in the CSS code above to help you customize your Blogger comment form according to your preferences.
There are three important areas, which are,
#mbt-form iframe
#mbt-form iframe:hover
#mbt-form a
Here are the details for each section
1.    Customization For Active Mode
#mbt-form iframe
This part is responsible for the active appearance of comment box when mouse cursor is not hovered on it. It includes the following style properties,
background: This property is responsible for the background color, background image and background image’s position. Where,
  • #ffffff : This is the background color. You can change it using our Color Chart
  • url : This is the URL for the background image. I used the baby in this case. You can change this image with anything you like.
  • bottom right: This positions the background image. I positioned the baby on bottom right corner. You can position the image at bottom right or bottom left or top right or top left
border: This CSS property defines the border size/width, style and color of the comment box. I have set these values for the Comment form in active mode(not on mouse over),
  • border size to 7px,
  • border style to solid. You can choose solid, dotted, dashed etc. See this page on border styles
  • border color to  #C7C7C7. Use our CSS Color Chart for using a different color.
padding: This CSS property is responsible for the distance/gap between the Comment Form border and its text area. You can increase this value if you wish to insert an image at top right or top left corner of the form.
font:  This CSS property defines the boldness, font family and the size of the text. I have set the following for the text “Comment as:”
  • boldness to normal,
  • size to 12pt 
  • font family to  "ms sans serif". If in case the browser doesn’t has the "ms sans serif" font then I have set Arial as a backup.
color: This property defines the color of the text “Comment as:” . Use our Color Chart for changing the text color.
width: This property sets the width of your Comment Form. You can see the comment from of my blog is wider than normal because I have adjusted its width. Set the width of your comment form a bit smaller than that of your post width. You can find your post width by finding the following code in your template (Edit HTML)
.post

2.  Customization For Mouse Hover Mode Now lets discuss the CSS properties for the form’s appearance when a mouse cursor is hovered on it.
#mbt-form iframe:hover
It has almost the same explanations for background and border as we discussed earlier. Setting these two CSS properties will effect the second image only that appears on mouse hover.
3. Customization For The Link Colors
#mbt-form a
This part defines the color of these two links -> “Sign out” and “Subscribe by email” . These links appear at bottom right corner of every Blogger Comment Form.
color: This sets the link color. Set a link color as contrast to the background color.

That’s All!
I hope this tutorial will be of great help to bloggers and designers. We request everyone to kindly link back if you wish to share this unique tutorial with your readers and friends. We thank you for your patience.
Any question is welcomed :>
Best Blogger Gadgets