
Album- Akash Dake Maa (2011)
Artist- Swagatalakshmi Dasgupta
Format- Mp3
Bitrate- 128Kbps

==============================
All Songs Zip HulkShare [Download]
==============================

 In most blogs which are selling ad spots you often have seen random Ad banners appearing when the page is refreshed. Ever wondered how to show random Ad Banners in Blogger? In today's tutorial we will learn how to create a Random Banner Widget for blogger which will show random Ad banners when a visitor visits a new page on your blog. Using this widget you can display as many Ad banners on a Sponsor Area as you want!
<div align="center">
<table border="0" cellpadding="2" cellspacing="6" width="265" bgcolor="#ffffff">
<tbody><tr>
<td><center>
<!-- BANNER#1 -->
<script language="JavaScript">
images = new Array(2);
images[0] = "<a href = 'URL OF ADVERTISER' rel='nofollow' ><img src='URL OF BANNER’S IMAGE-1' border='0' height='125' width='125' alt='AD DESCRIPTION'></a>";
images[1] = "<a href = 'URL OF ADVERTISER' rel='nofollow' ><img src='URL OF BANNER’S IMAGE-2' border='0' height='125' width='125' alt='AD DESCRIPTION'></a>";
index = Math.floor(Math.random() * images.length);
document.write(images[index]);
</script>
</center></td>
<td><center>
<!-- BANNER#2 -->
<script language="JavaScript">
images = new Array(2);
images[0] = "<a href = 'URL OF ADVERTISER' rel='nofollow' ><img src='URL OF BANNER’S IMAGE-1' border='0' height='125' width='125' alt='AD DESCRIPTION'></a>";
images[1] = "<a href = 'URL OF ADVERTISER' rel='nofollow' ><img src='URL OF BANNER’S IMAGE-2' border='0' height='125' width='125' alt='AD DESCRIPTION'></a>";
index = Math.floor(Math.random() * images.length);
document.write(images[index]);
</script>
</center></td>
</tr>
<tr>
<td><center>
<!-- BANNER#3 -->
<script language="JavaScript">
images = new Array(2);
images[0] = "<a href = 'URL OF ADVERTISER' rel='nofollow' ><img src='URL OF BANNER’S IMAGE-1' border='0' height='125' width='125' alt='AD DESCRIPTION'></a>";
images[1] = "<a href = 'URL OF ADVERTISER' rel='nofollow' ><img src='URL OF BANNER’S IMAGE-2' border='0' height='125' width='125' alt='AD DESCRIPTION'></a>";
index = Math.floor(Math.random() * images.length);
document.write(images[index]);
</script>
</center></td>
<td><center>
<!-- BANNER#4 -->
<script language="JavaScript">
images = new Array(2);
images[0] = "<a href = 'URL OF ADVERTISER' rel='nofollow' ><img src='URL OF BANNER’S IMAGE-1' border='0' height='125' width='125' alt='AD DESCRIPTION'></a>";
images[1] = "<a href = 'URL OF ADVERTISER' rel='nofollow' ><img src='URL OF BANNER’S IMAGE-2' border='0' height='125' width='125' alt='AD DESCRIPTION'></a>";
index = Math.floor(Math.random() * images.length);
document.write(images[index]);
</script>
</td></center>
</tr>
</tbody></table>
<table border="0" bordercolor="#0084ce" cellpadding="2" cellspacing="6" width="265" bgcolor="#ffffff">
<tbody>
<tr>
<td><center><a href="URL OF ADVERTISER" rel="nofollow"><img width="265" height="37" border="0" alt="Advertise Now!" src="file:///C:/Documents%20and%20Settings/Mohammad/Desktop/ADVERTISE-HERE.gif" /></a></center></td>
</tr>
</tbody></table>
</div>
 You have seen that I have created an automatically updated table of contents page that shows the links to all posts published so far at this blog. This widget displays all your posts category wise and really saves time. I was previously adding new links manually to the Blogger Tricks page but as soon as I came to know of this great widget from Abu Farhan I instantly converted to it. This widget will also tell visitors that which posts are new and which are old. I have modified the CSS in order to make it suit your blog appearance.
 /*--------MBT TOC-----*/5. Save your template and now create a New Page (not a new Post).
.judul-label{
background-color:#E5ECF9;
font-weight:bold;
line-height:1.4em;
margin-bottom:5px;
overflow:hidden;
white-space:nowrap;
vertical-align: baseline;
margin: 0 2px;
outline: none;
cursor: pointer;
text-decoration: none;
font: 14px/100% Arial, Helvetica, sans-serif;
padding: .5em 2em .55em;
text-shadow: 0 1px 1px rgba(0,0,0,.3);
-webkit-border-radius: .5em;
-moz-border-radius: .5em;
border-radius: .5em;
-webkit-box-shadow: 0 1px 2px rgba(0,0,0,.2);
-moz-box-shadow: 1px 1px 4px #AAAAAA;
box-shadow: 0 1px 2px rgba(0,0,0,.2);
color: #e9e9e9;
border: 2px solid white !important;
background: #6e6e6e;
background: -webkit-gradient(linear, left top, left bottom, from(#888), to(#575757));
background: -moz-linear-gradient(top, #888, #575757);
filter: progid:DXImageTransform.Microsoft.gradient(startColorstr='#888888', endColorstr='#575757');
}
.data-list{
line-height:1.5em;
margin-left:5px;
margin-right:5px;
padding-left:15px;
padding-right:5px;
white-space:nowrap;
text-align:left;
font-family:"Arial",sans-serif;
font-size:12px;
}
.list-ganjil{
background-color:#F6F6F6;
}
.headactive{
color: #fef4e9;
border: 2px solid white !important;
background: #1C8DFF;
background: -webkit-gradient(linear, left top, left bottom, from(#9dc2e7), to(#438cd2));
background: -moz-linear-gradient(top, #9dc2e7, #438cd2);
filter: progid:DXImageTransform.Microsoft.gradient(startColorstr='#9dc2e7', endColorstr='#438cd2');
}
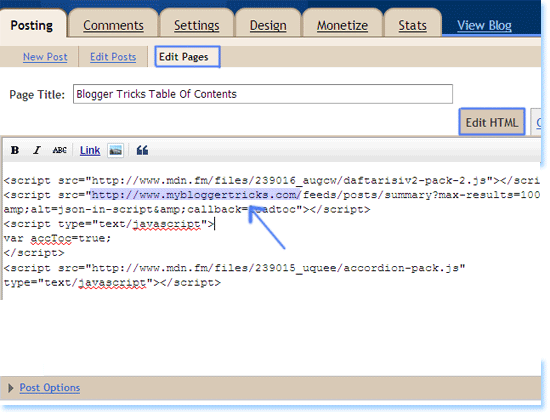
<script src="http://abu-farhan.com/script/acctoc/daftarisiv2-pack.js"></script>
<script src="http://www.mybloggertricks.com/feeds/posts/summary?max-results=1000&alt=json-in-script&callback=loadtoc"></script>
<script type="text/javascript">
var accToc=true;
</script>
<script src="http://abu-farhan.com/script/acctoc/accordion-pack.js" type="text/javascript"></script>

 Best Blogger Gadgets

