
Step#6 has been updated. Repeat that step to get it working just perfect.
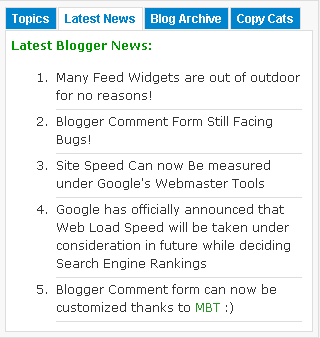 I had published a post on how to add a multi tab widget to your blogger blogs and how to customize it to suit your blog layout some months ago. The only problem with that widget is that it is not fully widgetized i.e you can not add archives, labels, author profile or other blogger official widgets to it unless you have their separate code with you. I just came across a beautiful and a more flexible and advanced tabber widget stylized by Lawny Designs and scripted by Barelyfitz. I have modified lawny’s tutorial and have made some changes to the code so to make it even more simpler to newbie bloggers. You can view this widget hanging on my sidebar.
To add this cute multi tab widget to your BlogSpot blogs follow these steps.
4. Now search for ]]></b:skin> and just above it paste this code,
5. Don’t save your template. Now search for Variable definitions and paste this code with other variable definitions,
UPDATED PART:
6. Now the final part. Search for
7. Finally save your template and visit Layout > Page Elements to start adding widgets to the tabs! It will look something like this,

The widgets are arranged number wise. Starting from Tab-1 and ending at Tab-4. To add a gadget/widget to any tab simply click the link Add a Gadget and start adding whatever you want.
8. Finally view your template to see it hanging!:)
Changing Position:
To shift this tabber widget to the bottom section of your sidebar rather at the extreme top, do this,

This code has four main sections amongst which the sections tbbxcolor1: and tbbxcolor2: are the most important. I will describe each one in detail.
Important Sections:
tbbxcolor1: This is an important section. It defines the background colour of this multi tab widget and also the colour on mouse hover. The default colour is white i.e #ffffff
tbbxcolor2: This refers to the background colour of the tabs and the text inside the tabs. the default colour is green. You can change the value #289728 to a different colour value using our color chart
Change these only if you wish:
tbbxbgcolor: This section refers to the background colour of the tab box. By default the colour is grey. If you wish to change it to a different colour simply change the hexadecimal colour value #f8f8f8 to something different using our Color Chart
tbbxbrcolor: This refers to the border line color across the tabs and the box.
That’s All!
I hope this widget will help a lot in giving a clean and neat touch to your blogs. Any question is welcomed :>
I had published a post on how to add a multi tab widget to your blogger blogs and how to customize it to suit your blog layout some months ago. The only problem with that widget is that it is not fully widgetized i.e you can not add archives, labels, author profile or other blogger official widgets to it unless you have their separate code with you. I just came across a beautiful and a more flexible and advanced tabber widget stylized by Lawny Designs and scripted by Barelyfitz. I have modified lawny’s tutorial and have made some changes to the code so to make it even more simpler to newbie bloggers. You can view this widget hanging on my sidebar.- Go to Blogger > Layout > Edit HTML
- Search For </head>
- And paste the code below just above it,
<script type='text/javascript'>
//<![CDATA[
document.write('<style type="text/css">.tabber{display:none;}<\/style>');
function tabberObj(argsObj)
{
var arg;
this.div = null;
this.classMain = "tabber";
this.classMainLive = "tabberlive";
this.classTab = "tabbertab";
this.classTabDefault = "tabbertabdefault";
this.classNav = "tabbernav";
this.classTabHide = "tabbertabhide";
this.classNavActive = "tabberactive";
this.titleElements = ['h2','h3','h4','h5','h6'];
this.titleElementsStripHTML = true;
this.removeTitle = true;
this.addLinkId = false;
this.linkIdFormat = '<tabberid>nav<tabnumberone>';
for (arg in argsObj) { this[arg] = argsObj[arg]; }
this.REclassMain = new RegExp('\\b' + this.classMain + '\\b', 'gi');
this.REclassMainLive = new RegExp('\\b' + this.classMainLive + '\\b', 'gi');
this.REclassTab = new RegExp('\\b' + this.classTab + '\\b', 'gi');
this.REclassTabDefault = new RegExp('\\b' + this.classTabDefault + '\\b', 'gi');
this.REclassTabHide = new RegExp('\\b' + this.classTabHide + '\\b', 'gi');
this.tabs = new Array();
if (this.div) {
this.init(this.div);
this.div = null;
}
}
tabberObj.prototype.init = function(e)
{
var
childNodes,
i, i2,
t,
defaultTab=0,
DOM_ul,
DOM_li,
DOM_a,
aId,
headingElement;
if (!document.getElementsByTagName) { return false; }
if (e.id) {
this.id = e.id;
}
this.tabs.length = 0;
childNodes = e.childNodes;
for(i=0; i < childNodes.length; i++) {
if(childNodes[i].className &&
childNodes[i].className.match(this.REclassTab)) {
t = new Object();
t.div = childNodes[i];
this.tabs[this.tabs.length] = t;
if (childNodes[i].className.match(this.REclassTabDefault)) {
defaultTab = this.tabs.length-1;
}
}
}
DOM_ul = document.createElement("ul");
DOM_ul.className = this.classNav;
for (i=0; i < this.tabs.length; i++) {
t = this.tabs[i];
t.headingText = t.div.title;
if (this.removeTitle) { t.div.title = ''; }
if (!t.headingText) {
for (i2=0; i2<this.titleElements.length; i2++) {
headingElement = t.div.getElementsByTagName(this.titleElements[i2])[0];
if (headingElement) {
t.headingText = headingElement.innerHTML;
if (this.titleElementsStripHTML) {
t.headingText.replace(/<br>/gi," ");
t.headingText = t.headingText.replace(/<[^>]+>/g,"");
}
break;
}
}
}
if (!t.headingText) {
t.headingText = i + 1;
}
DOM_li = document.createElement("li");
t.li = DOM_li;
DOM_a = document.createElement("a");
DOM_a.appendChild(document.createTextNode(t.headingText));
DOM_a.href = "javascript:void(null);";
DOM_a.title = t.headingText;
DOM_a.onclick = this.navClick;
DOM_a.tabber = this;
DOM_a.tabberIndex = i;
if (this.addLinkId && this.linkIdFormat) {
aId = this.linkIdFormat;
aId = aId.replace(/<tabberid>/gi, this.id);
aId = aId.replace(/<tabnumberzero>/gi, i);
aId = aId.replace(/<tabnumberone>/gi, i+1);
aId = aId.replace(/<tabtitle>/gi, t.headingText.replace(/[^a-zA-Z0-9\-]/gi, ''));
DOM_a.id = aId;
}
DOM_li.appendChild(DOM_a);
DOM_ul.appendChild(DOM_li);
}
e.insertBefore(DOM_ul, e.firstChild);
e.className = e.className.replace(this.REclassMain, this.classMainLive);
this.tabShow(defaultTab);
if (typeof this.onLoad == 'function') {
this.onLoad({tabber:this});
}
return this;
};
tabberObj.prototype.navClick = function(event)
{
var
rVal,
a,
self,
tabberIndex,
onClickArgs;
a = this;
if (!a.tabber) { return false; }
self = a.tabber;
tabberIndex = a.tabberIndex;
a.blur();
if (typeof self.onClick == 'function') {
onClickArgs = {'tabber':self, 'index':tabberIndex, 'event':event};
/* IE uses a different way to access the event object */
if (!event) { onClickArgs.event = window.event; }
rVal = self.onClick(onClickArgs);
if (rVal === false) { return false; }
}
self.tabShow(tabberIndex);
return false;
};
tabberObj.prototype.tabHideAll = function()
{
var i;
for (i = 0; i < this.tabs.length; i++) {
this.tabHide(i);
}
};
tabberObj.prototype.tabHide = function(tabberIndex)
{
var div;
if (!this.tabs[tabberIndex]) { return false; }
div = this.tabs[tabberIndex].div;
if (!div.className.match(this.REclassTabHide)) {
div.className += ' ' + this.classTabHide;
}
this.navClearActive(tabberIndex);
return this;
};
tabberObj.prototype.tabShow = function(tabberIndex)
{
var div;
if (!this.tabs[tabberIndex]) { return false; }
this.tabHideAll();
div = this.tabs[tabberIndex].div;
div.className = div.className.replace(this.REclassTabHide, '');
this.navSetActive(tabberIndex);
if (typeof this.onTabDisplay == 'function') {
this.onTabDisplay({'tabber':this, 'index':tabberIndex});
}
return this;
};
tabberObj.prototype.navSetActive = function(tabberIndex)
{
this.tabs[tabberIndex].li.className = this.classNavActive;
return this;
};
tabberObj.prototype.navClearActive = function(tabberIndex)
{
this.tabs[tabberIndex].li.className = '';
return this;
};
function tabberAutomatic(tabberArgs)
{
var
tempObj,
divs,
i;
if (!tabberArgs) { tabberArgs = {}; }
tempObj = new tabberObj(tabberArgs);
divs = document.getElementsByTagName("div");
for (i=0; i < divs.length; i++) {
if (divs[i].className &&
divs[i].className.match(tempObj.REclassMain)) {
tabberArgs.div = divs[i];
divs[i].tabber = new tabberObj(tabberArgs);
}
}
return this;
}
function tabberAutomaticOnLoad(tabberArgs)
{
var oldOnLoad;
if (!tabberArgs) { tabberArgs = {}; }
oldOnLoad = window.onload;
if (typeof window.onload != 'function') {
window.onload = function() {
tabberAutomatic(tabberArgs);
};
} else {
window.onload = function() {
oldOnLoad();
tabberAutomatic(tabberArgs);
};
}
}
/* Run tabberAutomaticOnload() unless the "manualStartup" option was specified */
if (typeof tabberOptions == 'undefined') {
tabberAutomaticOnLoad();
} else {
if (!tabberOptions['manualStartup']) {
tabberAutomaticOnLoad(tabberOptions);
}
}
//]]>
</script>
4. Now search for ]]></b:skin> and just above it paste this code,
/*---------- Tabber Start-------- */
.tabberlive{
margin:0;
padding:5px;
clear:both;
background:$tbbxbgcolor;
border:1px solid $tbbxbrcolor;
}
.tabbernav {
margin:0;
padding: 3px 0;
border-bottom: 1px solid $tbbxbrcolor;
font-family:Arial,Helvetica,sans-serif;
font-size:12px;
font-weight:bold;
}
.tabbernav li {
list-style:none;
margin:0;
display:inline;
}
.tabbernav li a {
padding:3px 0.5em;
margin-right:1px;
border:1px solid $tbbxbrcolor;
border-bottom:none;
background:$tbbxcolor2;
text-decoration:none;
color:$tbbxcolor1;
}
.tabbernav li a:hover {
color:$tbbxcolor2;
background:$tbbxcolor1;
border-color:$tbbxbrcolor;
text-decoration:none;
}
.tabbernav li.tabberactive a,
.tabbernav li.tabberactive a:hover {
background:$tbbxcolor1;
color:$tbbxcolor2;
border-bottom: 1px solid $tbbxcolor1;
}
.tabberlive .tabbertab {
padding:5px;
border:1px solid $tbbxbrcolor;
border-top:0;
background:$tbbxcolor1;
}
.tabberlive .tabbertab h2,
.tabberlive .tabbertabhide {
display:none;
}
.tabbertab .widget-content ul{
list-style:none;
margin:0 0 10px 0;
padding:0;
}
.tabbertab .widget-content li {
border-bottom:1px solid $tbbxbrcolor;
margin:0 5px;
padding:2px 0 5px 0;
}
/*------- Tabber End--------*/
5. Don’t save your template. Now search for Variable definitions and paste this code with other variable definitions,
If you can’t find Variable definitions then search for #navbar-iframe and paste this code below #navbar-iframe { Some text here }<Variable name="tbbxbgcolor" description="Tab box Background Color" type="color" default="#f8f8f8" value="#f8f8f8">
<Variable name="tbbxbrcolor" description="Tab box Border Color" type="color" default="#dcdcdc" value="#dcdcdc">
<Variable name="tbbxcolor1" description="Tab box Color 1" type="color" default="#ffffff" value="#ffffff">
<Variable name="tbbxcolor2" description="Tab box Color 2" type="color" default="#5588aa" value="#5588aa">
/* Variable definitions
====================
<Variable name="tbbxbgcolor" description="Tab box Background Color" type="color" default="#f8f8f8" value="#f8f8f8">
<Variable name="tbbxbrcolor" description="Tab box Border Color" type="color" default="#dcdcdc" value="#dcdcdc">
<Variable name="tbbxcolor1" description="Tab box Color 1" type="color" default="#ffffff" value="#ffffff">
<Variable name="tbbxcolor2" description="Tab box Color 2" type="color" default="#5588aa" value="#5588aa">
*/
UPDATED PART:
6. Now the final part. Search for
<div id='sidebar-wrapper'> and paste this code just below it,<div style='clear:both;'/>
<div class='tabber'>
<b:section class='tabbertab' id='tab1' maxwidgets='1'/>
<b:section class='tabbertab' id='tab2' maxwidgets='1'/>
<b:section class='tabbertab' id='tab3' maxwidgets='1'/>
<b:section class='tabbertab' id='tab4' maxwidgets='1'/>
</div>
7. Finally save your template and visit Layout > Page Elements to start adding widgets to the tabs! It will look something like this,
The widgets are arranged number wise. Starting from Tab-1 and ending at Tab-4. To add a gadget/widget to any tab simply click the link Add a Gadget and start adding whatever you want.
8. Finally view your template to see it hanging!:)
Customization Guide To Multi Tab Widget
Here we will discuss how to change the Look and position of this multi tabbed widget.Changing Position:
To shift this tabber widget to the bottom section of your sidebar rather at the extreme top, do this,
- Paste the code in Step#6 just above </div> and not just below
<div id='sidebar-wrapper'>As shown in the image below,
- Save your template and go to Layout > Page Elements to see if it has shifted to the bottom.
- The background colours of the widget can be changed by editing the code in step#5. I am rewriting the code here with some description.
<Variable name="tbbxbgcolor" description="Tab box Background Color" type="color" default="#f8f8f8" value="#f8f8f8">
<Variable name="tbbxbrcolor" description="Tab box Border Color" type="color" default="#dcdcdc" value="#dcdcdc">

<Variable name="tbbxcolor1" description="Tab box Color 1" type="color" default="#ffffff" value="#ffffff">

<Variable name="tbbxcolor2" description="Tab box Color 2" type="color" default="#289728" value="#289728">
This code has four main sections amongst which the sections tbbxcolor1: and tbbxcolor2: are the most important. I will describe each one in detail.
Important Sections:
tbbxcolor1: This is an important section. It defines the background colour of this multi tab widget and also the colour on mouse hover. The default colour is white i.e #ffffff
tbbxcolor2: This refers to the background colour of the tabs and the text inside the tabs. the default colour is green. You can change the value #289728 to a different colour value using our color chart
Change these only if you wish:
tbbxbgcolor: This section refers to the background colour of the tab box. By default the colour is grey. If you wish to change it to a different colour simply change the hexadecimal colour value #f8f8f8 to something different using our Color Chart
tbbxbrcolor: This refers to the border line color across the tabs and the box.
That’s All!
I hope this widget will help a lot in giving a clean and neat touch to your blogs. Any question is welcomed :>


 The widgets on a Wordpress Blogs surely are well designed and coded but they look even better when they are bloggerized and made compatible to work in
  Start adding your widgets and after you have added all your widgets then simply view your blog to see it in action. Done! :-)
 As I promised in my post on


 Note:- Don’t worry about that Hot tip! I am here to take all that headache :D


